pxGrid in Depth
pxGrid version 1 was designed by extending the Extensible Messaging and Presence Protocol (XMPP), which is also the communication protocol used by Jabber. In fact, the pxGrid controller itself is a modified Jabber Extensible Communications Platform (XCP) server. (For more on XMPP, see https://xmpp.org.)
The XCP needs a client that knows how to communicate with it. Cisco DevNet partners can create applications that use the pxGrid common library (GCL) to join the pxGrid controller without having to write their own client from scratch.
Beginning in ISE version 2.3, ISE added a modernized WebSocket-based interface to pxGrid, to make it easier to integrate with. DevNet partners no longer are required to integrate a Java or C library into their application; they can use common Representational State Transfer (REST) connections instead.
No matter what the version, always remember that pxGrid is made up of three main components: a controller, publishers, and subscribers. Figure 6-5 is a basic drawing to illustrate this with products.
)
Figure 6-5 Sample pxGrid Illustration
pxGrid in Action
pxGrid uses secure communication between the participants, and therefore certificates are of great importance to the success and ease of your deployment. Every participant must trust the controller, and the controller must trust each of the participants.
Examining Figure 6-5 again, the Cisco Firepower Management Center (FMC) will need to speak to the pxGrid controller to learn of the topics that exist and who has published those topics, but then also speak directly to the MnT node to perform bulk downloads of the published session data. If the FMC were to trust the pxGrid controller’s certificate but not the MnT’s certificate, then the communication would ultimately fail.
Figure 6-6 illustrates this concept. You end up needing a full mesh of trust between pxGrid participants. Each participant must trust the controller as well as each other participant.
)
Figure 6-6 Full Mesh of Trust
Based on a lot of deployment experience, the resulting best practice is to always use the same certificate authority (CA) to issue the pxGrid certificates for each of the participants. To make that even easier, ISE’s built-in CA was enhanced to issue pxGrid certificates in addition to endpoint certificates beginning with ISE version 2.1. In addition to the enhancement to the CA, APIs were added to automate the certificate enrollment from a pxGrid ecosystem partner—these are the exact same APIs and CA that Cisco’s flagship DNA Center product uses to integrate with ISE.
Figure 6-7 illustrates a single CA issuing the certificates to all the participants.
)
Figure 6-7 ISE CA Issuing the pxGrid Certificates to All Participants
Context-In
pxGrid not only shares context from ISE (referred to as context-out) but also is used for sharing information between external systems. As of ISE version 2.4, ISE is also able to receive information through pxGrid to help ISE with its own profiling policies. This is referred to as context-in.
In Chapter 3, “Beyond Basic Network Access Control,” you learned about profiling and the different probes that ISE can use. One of those probes that was introduced in ISE version 2.4 is the pxGrid probe, which is used to learn profiling data about endpoints through pxGrid context-in.
The pxGrid profiling probe was first used with the Cisco Industrial Network Director (IND), which communicates with industrial switches and Internet of Things (IoT) security devices, collecting detailed information about the connected IoT devices.
IND v1.3 adds a pxGrid publisher interface to communicate IoT attributes to ISE, which are leveraged in profiling, as illustrated in Figure 6-8.
)
Figure 6-8 Industrial Network Director Using ISE pxGrid Probe
Configuring ISE for pxGrid
The pxGrid user interface is located under Administration > pxGrid Services. By default, the pxGrid services will not be enabled on any ISE node, and the following message will be displayed:
In order to navigate to the pxGrid Services page, pxGrid persona must be enabled on at least one node in the ISE deployment. Please click on this link to be redirected to the Deployment page.
You need to enable pxGrid on at least one of the policy services nodes in your deployment, but before enabling pxGrid on any of the ISE nodes in the deployment, it’s best to ensure that each node in the ISE cube has a pxGrid certificate signed by the same certificate authority.
Beginning in ISE 2.2, each node’s pxGrid certificate will be signed automatically by the internal CA. Naturally, you can replace that certificate with one from an external CA of your choosing, but the default certificate will use the internal CA in an attempt to simplify the setup and follow best practices. Truly, recommended practice dictates that you use the CA built into ISE for all pxGrid communications to keep things easy and working well. The steps are as follows:
Step 1. Navigate to Administration > System > Certificates, as shown in Figure 6-9.
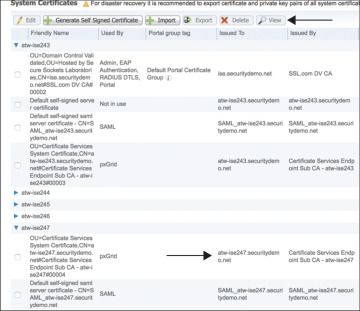
Figure 6-9 Viewing a pxGrid Certificate
Step 2. Select the pxGrid certificate of one of the nodes, by selecting the checkbook on the left end of the row.
Step 3. Click View.
Step 4. Check that the root signer of the certificate is the primary PAN of the ISE cube (the root CA), as shown in Figure 6-10.
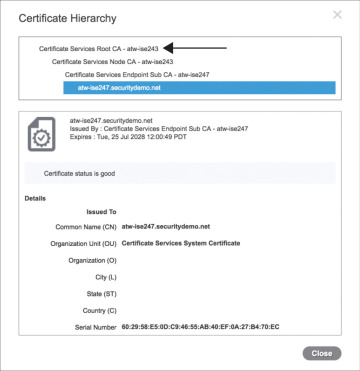
Figure 6-10 Checking the Root Signer of Certificate in Certificate Hierarchy
)
)
Once you’re sure the certificates in use are all issued by the same PKI, then it’s time to enable them. Experienced-based recommendation is to have a pxGrid certificate on every single node in the ISE deployment, even if the node will not run the pxGrid controller function.
To enable pxGrid on a PSN, follow these steps:
Step 1. Navigate to Administration > System > Deployment.
Step 2. The pxGrid controller function must run on a PSN. Select one of the PSNs from the list.
Step 3. Check the pxGrid check box, as shown in Figure 6-11.
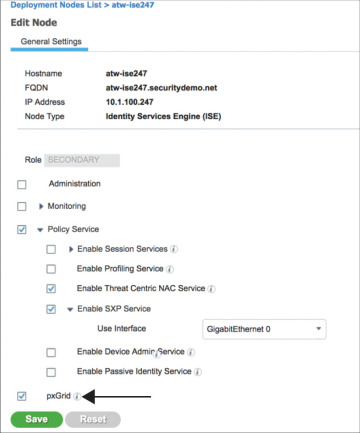
Figure 6-11 Enabling the pxGrid Controller Function
Step 4. Click Save.
)
This enables the pxGrid controller function on the PSN. You may have up to two pxGrid controllers per ISE cube to provide redundancy.
Once the pxGrid services are all up and running, the PAN and MnT will automatically register and publish their respective topics into the grid, as shown in Figure 6-12.
)
Figure 6-12 Default pxGrid Services after Enabling
Notice in Figure 6-12 the way the topics are listed under the pxGrid participant, as well as the role that node plays with the topic (Pub or Sub).
By default, only ISE nodes will be registered automatically; all others require approval, or they require you to enable auto-registration.
Configuring pxGrid Participants
There are many different subscribers and publishers that can participate in the ecosystem with pxGrid. Each one will use the information in its own way, and the integration UI is bound to be unique per product, but the basic requirements and configuration steps will always remain the same:
Step 1. Trust the ISE certificate authority.
Step 2. Install a pxGrid certificate for its own identity.
Step 3. Configure the IP or FQDN of the pxGrid controller.
For the most part, that is all that you really need to do on each participant. Some will make things easier than others. Let’s take a look at configuring some of the main pxGrid participants: Cisco Firepower Management Center, Cisco Stealthwatch, and Cisco Web Security Appliance.
Configuring Firepower Management Center for Identity with pxGrid
The Cisco Firepower Management Center (FMC) is the enterprise-class device manager and security monitoring tool for Cisco’s Firepower line of NGFWs and NGIPSs, described in detail in Chapter 5, “Next-Gen Firewalls,” of Integrated Security Technologies and Solutions -Volume I, which also covers the Firepower Device Manger (FDM) used for individual device management.
The FMC has had pxGrid integration with ISE for a while, but version 6.2 added an even better integration, with the ability to use the TrustSec data independent of user identities. The FMC can use context information provided by pxGrid, such as endpoint profiles, TrustSec tags, and both passive and active user identities.
Much like the FMC, the FDM solution is also capable of integrating with ISE using pxGrid, but this section is only focused on the FMC integration.
The Firepower Management Center leverages pxGrid to learn the context of who and what is on the network and the mapping of those devices to IP addresses. However, the FMC leverages the LDAP-based realms to learn about what users and groups exist in Active Director for the creation of access policy.
We will begin by configuring the pxGrid integration, and then follow up with the realm configuration.
Configuring Firepower Management Center for pxGrid
Before configuring pxGrid on the FMC, generate a pxGrid certificate for the FMC to use. Beginning with ISE 2.2, an administrator can download the CA’s certificates and generate certificates directly from the pxGrid Services user interface.
To generate a pxGrid certificate for the FMC:
Step 1. Navigate to Administration > pxGrid Services > Certificates, as shown in Figure 6-13.
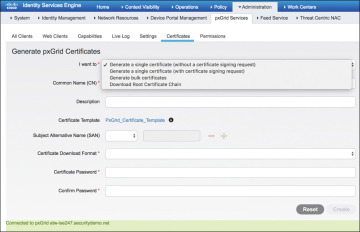
Figure 6-13 Generating a pxGrid Certificate for the FMC
Examining Figure 6-13, from this screen you can generate a single certificate, sign a certificate signing request (CSR), generate bulk certificates from a CSV file, or download the certificate authority chain for import into the trust store of the pxGrid participant. For the FMC, we need to generate a certificate-key pair.
Step 2. Select Generate a single certificate (without a certificate signing request).
Step 3. In the Common Name (CN) field, enter a common name for the subject of your certificate.
The CN is normally the FQDN of the host (e.g., atw-fmc.securitydemo.net). However, a common practice is to add a prefix to your CN, such as pxGrid-, which will help you avoid installation errors that can sometimes occur when you try to install more than one certificate with the same FQDN.
Step 4. In the Subject Alternative Name (SAN) spin box, add a SAN, if needed.
If you use anything other than the true FQDN for the device, then you need to enter a SAN in this field. Per RFC 6125, anytime you use a SAN, it must also contain the CN. Add an entry for the FQDN of the host. Adding a SAN for the IP address is helpful, just in case one of the pxGrid peers is sent to the host via the IP address instead of the FQDN.
Step 5. In the Certificate Download Format spin box, choose Certificate in Privacy Enhanced Electronic Mail (PEM) format, key in PKCS8 PEM format.
All options will include the internal CA’s certificates, for the entire PKI hierarchy. There is also an option to download it as a PKCS12 chain file, where the public certificate + private key + signing chain are all in a single file. For the FMC, the download format needs to be separate PEM files, not the PKCS12 chain.
Step 6. In the Certificate Password field, add a password for the private key (and then confirm it).
ISE will never issue private keys without a password to encrypt the key.
Step 7. Click Create and download the resulting ZIP file.
)
Figure 6-14 shows the completed certificate form, and Figure 6-15 shows the contents of the ZIP file.
)
Figure 6-14 Completed Certificate Form
)
Figure 6-15 Contents of the Resulting ZIP File
Examining Figure 6-15, the ZIP file contains the signed certificate, the encrypted private key, and all the signing certificates in the PKI hierarchy for the issued certificate. Additionally, the signing certificates in the PKI hierarchy for the admin certificate are also included for good measure. Beginning with ISE 2.2, they should not be required, but are included in the ZIP file anyway.
Now you have all the required certificates and the private key for the FMC. To configure pxGrid on the FMC:
Step 1. Navigate to System > Integration > Identity Sources, as shown in Figure 6-16.
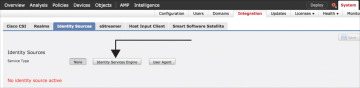
Figure 6-16 FMC Identity Sources
Step 2. Click the Identity Services Engine button.
Step 3. In the Primary Host Name/IP Address field, enter the FQDN or IP address of the primary pxGrid controller.
Step 4. If there is a secondary controller, add its FQDN or IP address in the Secondary Host Name/IP Address field.
Step 5. Click the green + button to the right of the pxGrid Server CA field to add the ISE root CA certificate.
This adds the root CA certificate to the list of trusted CAs in the FMC. In the Name field, give the certificate a name that makes sense to you, similar to what you see in Figure 6-17.
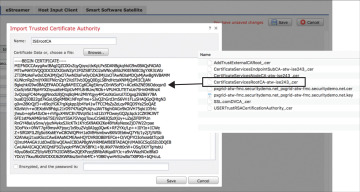
Figure 6-17 Import Trusted Certificate Authority: ISE Root CA
Step 6. Click Browse and select the root CA certificate from the expanded ZIP file you downloaded earlier, as shown in Figure 6-17.
Step 7. Click Save.
Step 8. Ensure that the newly imported root CA certificate is listed in both the pxGrid Server CA and the MNT Server CA fields, as shown in Figure 6-19.
Step 9. Add the signed certificate and private key for the FMC by clicking the green + button to the right of the FMC Server Certificate field.
This adds to the FMC the PEM-encoded certificate that was signed by ISE’s endpoint CA and the encrypted private key. In the Name field, give the internal certificate a name that makes sense to you, similar to what you see in Figure 6-18.
Step 10. Click Browse for Certificate Data and select the PEM certificate from the expanded ZIP file you downloaded earlier, as shown in Figure 6-18.
Step 11. Click Browse for Key and select the PKCS8 key file from the expanded ZIP file you downloaded earlier, as shown in Figure 6-18.
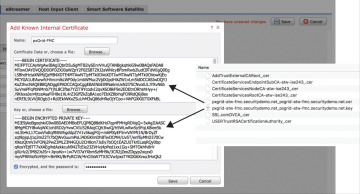
Figure 6-18 Adding the Internal Certificate
Step 12. Click Save in the upper right corner of the screen. Figure 6-19 shows the completed form.
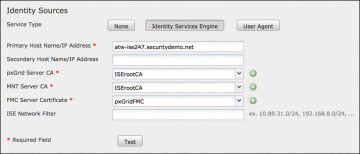
Figure 6-19 Completed ISE Identity Source Form
Step 13. Click Test to verify a successful connection.
The test will most likely fail the first time you try unless ISE is configured to automatically approve new participants.
Step 14. In the ISE UI, navigate to Administration > pxGrid Services > Clients.
If ISE is not configured to auto-approve participants, you need to accept the FMC’s agent and test agent.
Step 15. Check the corresponding check box for the iseagent client for the FMC, as shown in Figure 6-20, and click Approve.
Step 16. Check the firesightisetest client check box and click Approve.
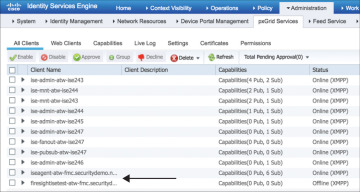
Figure 6-20 pxGrid Clients
Step 17. Return to the FMC UI and click Test to attempt the test again. This test should be successful.
)
)
)
)
)
Manually approving each and every pxGrid participant and their test accounts can be time consuming and somewhat confusing. Alternatively, you may enable the automatic approval of certificate-based accounts in the pxGrid Settings, as shown in Figure 6-21. Just remember to disable it again after you are finished.
)
Figure 6-21 Enabling Automatic Approval of Certificate-Based Accounts in pxGrid Settings
Configuring Realms for Identity in Access Rules
The FMC may download all the users and IP address bindings to its heart’s content, but none of the data that is downloaded will be used in the policy until there is a realm configured to determine which groups and users to use in the firewall policies.
Realms leverage LDAP or LDAP/S to communicate to query the data from Active Directory. Within the FMC:
Step 1. Navigate to System > Integration > Realms.
Step 2. Click New Realm.
Step 3. Provide a name for the realm and then choose AD from the Type drop-down list.
Step 4. In the AD Primary Domain field, enter the IP address of the domain controller that the FMC should use to query AD.
Step 5. In the AD Join Username field, provide a UPN (user principal name) for an AD user with enough permissions to join the FMC to the domain, such as administrator@securitydemo.net (used in this example).
Step 6. In the AD Join Password field, enter the password for the AD user.
Step 7. In the Directory Username field, provide a UPN for an AD user account for performing the LDAP queries, such as administrator@securitydemo.net.
Step 8. In the Base DN field, enter the base distinguished name to begin the user account LDAP queries, such as ou=users,dc=securitydemo,dc=net.
Step 9. Enter the base DN (distinguished name) to begin the group LDAP queries, such as ou=groups,dc=securitydemo,dc=net.
Step 10. Click OK.
Figure 6-22 shows the completed Add New Realm form.
)
Figure 6-22 Completed Add New Realm Form
After the realm has been created, you will need to add a “directory,” which is another way of saying you need to add an LDAP server to perform the queries against.
Step 1. From the Realm configuration screen, click Add directory.
Step 2. In the Hostname/IP Address field, enter the IP address for the AD domain controller that the FMC should use for LDAP queries.
Step 3. In the Port field, enter the port for LDAP; 389 is the default port for unencrypted LDAP.
Step 4. If you are using secure LDAP, choose the encryption method and the certificate to trust.
Step 5. Click OK.
Figure 6-23 shows the completed directory entry.
)
Figure 6-23 Completed Directory Entry
Now that the realm is configured along with an LDAP server, it is time to download users and groups for use in the policies:
Step 1. Click the User Download tab.
Step 2. Check the Download users and groups check box.
Step 3. Select the interesting groups from the Available Groups list and use the Add to Include and Add to Exclude buttons to assign them for inclusion for use or exclusion from use within Firepower policies, as shown in Figure 6-24.

Figure 6-24 Included and Excluded Groups
Selective inclusion of AD groups is a key item for performance, as AD may have thousands of groups, most of which will not be relevant for identity policies in the firewalls, nor would it perform very well if all groups were candidates for identity rules.
Step 4. Click Save.
Step 5. Enable the Realm, as shown in Figure 6-25.

Figure 6-25 Enabled Realm
)
)
The realm is now fully configured for rule creation, along with the pxGrid integration for learning what IP addresses belong to which users and devices. Now you are ready to add identity information to the access policy rules in the FMC.
Configuring Firepower Access Rules with Context from pxGrid
Before you can add user identities or groups to the access-policy rule, you must first create an identity rule:
Step 1. Navigate to Policies > Access Control > Identity.
Step 2. Click New Policy.
Step 3. In the New Identity policy dialog box, shown in Figure 6-26, enter a name and, optionally, a description.
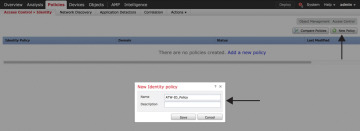
Figure 6-26 Creating a New Identity Policy
Step 4. Click Save.
Step 5. Click Add Rule to configure an identity rule.
Step 6. In the Name field, enter a name.
Step 7. Keep the Enabled check box checked.
Step 8. In the Action drop-down list, select Passive Authentication.
Step 9. Click the Realm & Settings tab.
Step 10. From the Realm drop-down list, select your AD realm.
Step 11. Click Add.
Figure 6-27 shows the new rule being added to the identity policy.
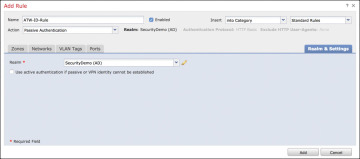
Figure 6-27 Adding the Identity Rule to the Identity Policy
Now that an identity policy has been created, you can attach it to the access policy.
Step 12. Navigate to Access Policy > Access Policy.
Step 13. Click the link in Identity Policy field.
Step 14. In the Identity Policy dialog box, choose your identity policy from the drop-down list.
Step 15. Click OK.
Figure 6-28 shows the identity policy being selected in the access policy.
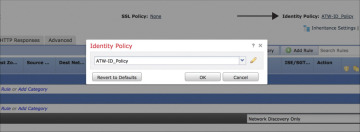
Figure 6-28 Selecting the Identity Policy in the Access Policy
Now that an identity policy has been attached to the access policy, you can add identities to the access rule.
Step 16. Navigate to Access Policy > Access Policy.
Step 17. Either click Add Policy to create a new policy or click Edit to add an existing policy.
Step 18. Click the Users tab.
Step 19. In the Available Realms column, select the realm you created.
Step 20. In the Available Users column, select the groups or users to match in this access rule.
Step 21. Click Add to Rule to transfer them to the Selected Users column.
Figure 6-29 shows the user group Employees being added to the access rule.
Step 22. Click the SGT/ISE Attributes tab.
Step 23. In the Available Attributes column, select Security Group Tag.
Step 24. In the Available Metadata column, select one of the SGTs from ISE and click Add to Rule.
Figure 6-30 shows the SGT named Employees being added to the access rule.

Figure 6-30 Adding SGTs to an Access Policy Rule
Step 25. In the Available Attributes column, select Device Type.
Step 26. In the Available Metadata column, select the endpoint profiles and click Add to Rule to add them to the policy.
Step 27. Click Add to save the access policy rule to the policy.
Step 28. Click Save to save the policy.
Figure 6-31 shows device type groups being added to the access rule.
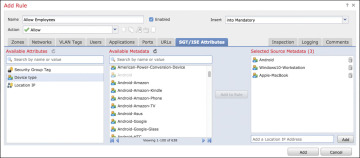
Figure 6-31 Adding Endpoint Profiles to an Access Policy Rule
)
)
)
)
Figure 6-29 Adding AD Groups to an Access Policy Rule
Because we have integrated Firepower Management Center with ISE, we also have access to other bits of contextual data to build our policy on, such as endpoint profiles and TrustSec tags (also known as Scalable Group Tags or Security Group Tags).
)
)
Viewing Active Users
You’ve completed all the configuration steps for the identity integration with the FMC and ISE, but how do you know that the FMC is learning about the active and passive online users and devices?
Navigate to Analysis > Users > Active Sessions and you should start seeing domain logons, such as what you see in Figure 6-32.
)
Figure 6-32 Online Users Learned from ISE
Figure 6-32 shows the online users that ISE has learned about through either active or passive identity mappings. See Chapter 3, “Beyond Basic Network Access Control,” for more on active versus passive identities.
For the CLI-oriented CCIE or CCIE candidate, there is also a great way to see the user identities from the command line, adi_cli session, as shown in Example 6-1.
Configuring Rapid Threat Containment with Firepower and ISE
Learning about the online users and endpoints is only one of the use cases when integrating the FMC with ISE. Another common use case of the integration is to act when a malicious activity has occurred, as you learned about in the “Rapid Threat Containment” section earlier in this chapter.
Figure 6-33 illustrates how the FMC works with correlation rules and remediation modules, to aid your understanding of how all the pieces fit together.
)
Figure 6-33 Illustration of Correlation Policies and Components
The parts that make up the response are as follows:
Correlation policy: The policy construct that is made up of correlation rules and configured remediations.
Correlation rule: An individual rule housed inside of a correlation policy that is configured to look for one or more security events. There can be one or many correlation rules in each correlation policy.
Remediation module: Modules of the FMC that understand how to communicate to an external system; for example, the pxGrid module knows how to use EPS on ISE to quarantine endpoints.
Remediation instance: A specific instance of a remediation module, as there can be many instances, each with a different configuration.
Remediation: A specific action that is configured, such as quarantine. There can be many remediations in each instance of the remediation module.
The pxGrid mitigation module is built into the FMC, and that module can be used to take an EPS quarantine action when a correlation rule is triggered. Let’s start by configuring the built-in pxGrid mitigation module:
Step 1. Navigate to Policies > Actions > Remediation > Modules, which brings you to the Installed Remediation Modules screen, as shown in Figure 6-34.

Figure 6-34 Remediation Modules
Step 2. Click the magnifying glass icon (not shown in Figure 6-34) at the right end of the pxGrid Mitigation module row.
Step 3. Click Add to create a new instance of the module.
Step 4. Provide a name for the instance and an optional description, as shown in Figure 6-35.
Step 5. Click Create.
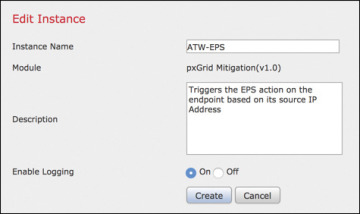
Figure 6-35 Creating a New Instance of the pxGrid Mitigation Module
Step 6. Choose Mitigate Source in the Configured Remediations drop-down list, as shown in Figure 6-36.
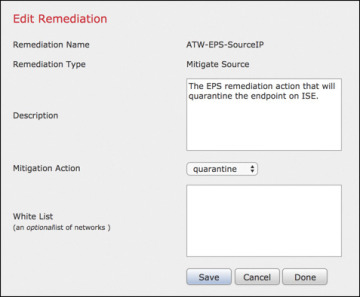
Figure 6-36 Select Mitigate Source
Step 7. Click Create.
After clicking Create, you are brought automatically to the window where you create a remediation action for the module.
Step 8. Provide a name for the remediation and an optional description, as shown in Figure 6-37.
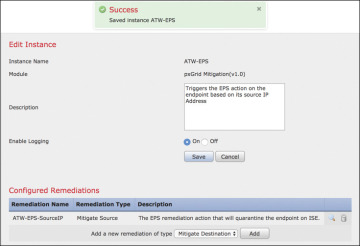
Figure 6-37 Creating the Remediation
Step 9. Set the Mitigation Action to quarantine, as shown in Figure 6-36.
Step 10. Click Create.
Step 11. Click Save.
Step 12. Click Done.
Step 13. Click Save to save the module instance.
Figure 6-38 shows the completed instance of the pxGrid mitigation module.
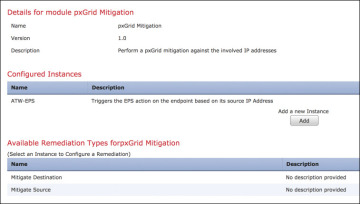
Figure 6-38 Completed pxGrid Mitigation Module
The remediation module is ready for use, so now we need to create a correlation rule that will use the remediation module whenever that correlation rule is matched.
Step 14. Navigate to Policies > Correlation > Rule Management.
Step 15. Click Create Rule.
Figure 6-39 shows a completed correlation rule that looks for an AMP for endpoints event where a cloud recalled file is unable to be quarantined.
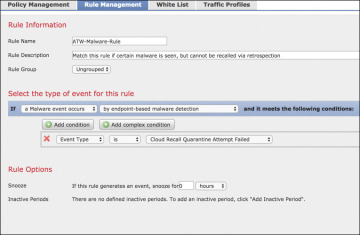
Figure 6-39 Completed Correlation Rule
Now that rule exists, we can add it to the correlation policy.
Step 16. Navigate to Policies > Correlation > Policy Management.
Step 17. Click Create Policy.
Step 18. Provide a policy name and an optional description in the corresponding fields.
Step 19. Click Add Rules.
Step 20. Select the correlation rule you created.
Figure 6-40 shows a correlation policy, with the correlation rule added; however, there is no remediation action configured yet.
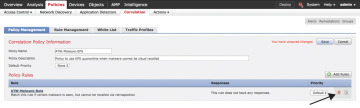
Figure 6-40 Correlation Policy without a Remediation Action
Let’s add that remediation action.
Step 21. Click the response icon, pointed to in Figure 6-40.
Step 22. Assign the remediation action you created, as shown in Figure 6-41.

Figure 6-41 Assigning the Remediation Action
Step 23. Click Update.
Step 24. Click Save.
Step 25. Enable the policy, as shown in Figure 6-42.

Figure 6-42 Final Policy, Enabled
)
)
)
)
)
)
)
)
)
Configuring the Web Security Appliance for Identity with pxGrid
The Cisco Web Security Appliance (WSA) was one of the first pxGrid partner applications in the security ecosystem. The WSA may use pxGrid to ascertain both passive and active user identities, as well as TrustSec tags; however, at the time of writing, the WSA (version 11.5.1) is unable to combine Active Directory group membership with the identity information gathered from pxGrid, which means that TrustSec tagging is realistically the only scalable approach when using pxGrid.
Integrating the WSA and ISE with pxGrid
All pxGrid participants should be using certificates that are issued from the ISE internal CA. This is not a requirement, but it is certainly a best practice to ensure things always work optimally. So, before you continue to the following steps, create a certificate private-key pair, just like you did for the FMC in the “Configuring Firepower Management Center for pxGrid” section earlier in the chapter.
To configure pxGrid on the WSA, we will first add the ISE root certificates to the trusted certificate store:
Step 1. Navigate to Network > Certificate Management.
Step 2. Click Manage Trusted Root Certificates, as indicated in Figure 6-43.

Figure 6-43 Network > Certificate Management
Step 3. Click Import, as shown at the top of Figure 6-44.
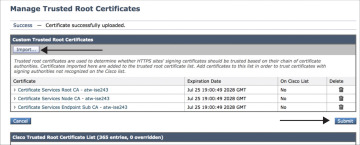
Figure 6-44 Manage Trusted Root Certificates
Step 4. Browse for each of the ISE CA certificates (Root, Node, and Endpoint) and click Submit, one at a time.
Step 5. When all of the signing certificates are uploaded, click Submit, as indicated in Figure 6-44.
Step 6. Click Commit Changes to save the WSA configuration.
)
)
Now that the ISE root certificates will be trusted, it is time to configure the WSA for pxGrid:
Step 1. Navigate to Network > Identification Services > Identity Services Engine.
Step 2. Click Enable and Edit Settings, as shown in Figure 6-45.

Figure 6-45 Identification Servers > Identity Services Engine
In the Primary ISE pxGrid Node section:
Step 3. In the Hostname or IPv4 address field, enter the FQDN for the primary pxGrid controller.
Step 4. Click Choose File and select the ISE root CA certificate.
Step 5. Click Upload File.
Figure 6-46 shows the completed Primary ISE pxGrid Node section.
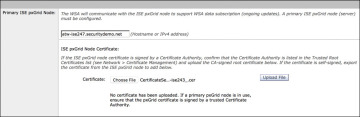
Figure 6-46 Primary ISE pxGrid Node
Step 6. In the ISE Monitoring Node Admin Certificates section, click Upload File and upload the ISE root CA certificate for both the Primary and Secondary ISE Monitoring nodes.
Figure 6-47 shows the completed ISE Monitoring Node Admin Certificates section.
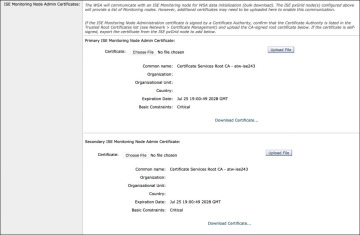
Figure 6-47 ISE Monitoring Node Admin Certificates
In the WSA Client Certificate Section:
Step 7. Click Use Uploaded Certificate and Key.
Step 8. Click Choose File in the Certificate field and select the WSA’s certificate from the ISE CA.
Step 9. Click Choose File in the Key field and select the WSA’s private key from the ISE CA.
Step 10. Check the Key is Encrypted check box.
Step 11. In the Password field, enter the password that you used to encrypt the key.
Step 12. Click Upload Files.
Figure 6-48 shows the WSA certificate and key selected and ready for upload.
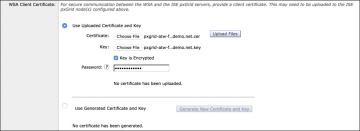
Figure 6-48 WSA Client Certificate Section
Step 13. Click Submit to complete the configuration.
Step 14. Click Commit Changes twice.
Step 15. To test the connection, click Edit Settings.
Step 16. Click Start Test at the bottom of the screen, as shown in Figure 6-49. If auto-approval is enabled, then the test should be successful. If it is not enabled, the test will fail until you manually approve the two WSA accounts on the pxGrid controller.
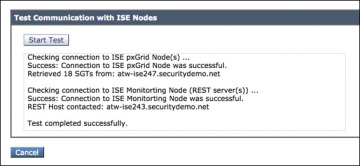
Figure 6-49 Test Communication with ISE Nodes
)
)
)
)
)
Example 6-2 shows an example of the test output.
Configuring WSA Policies That Leverage the Data from ISE
Now that you have configured the WSA to work with ISE and to subscribe to the interesting pxGrid topics, it is time to configure policies. The first step is to create an identification profile:
Step 1. Navigate to Web Security Manager > Identification Profiles.
Step 2. Click Add Identification Profile.
Step 3. In the Name field, provide a name for the profile.
Step 4. In the User Identification Method section, in the Identification and Authentication spin box, select Transparently identify users with ISE.
Step 5. Click Submit.
Step 6. Click Commit Changes to save the WSA configuration.
Figure 6-50 shows the completed identification profile.
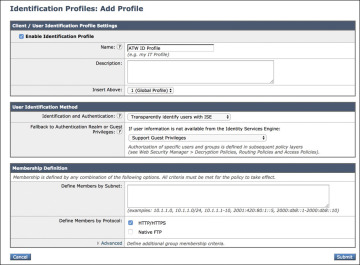
Figure 6-50 Identification Profile
To add an access policy leveraging security group tags from ISE:
Step 7. Navigate to Web Security Manager > Access Policies.
Step 8. Click Add Policy.
Step 9. In the Policy Name field, provide a name for the policy, as shown in Figure 6-51.
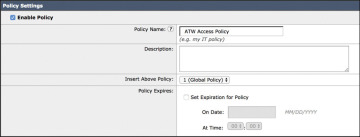
Figure 6-51 Naming the Access Policy
Step 10. In the Identification Profiles and Users section, choose Select One or More Identification Profiles in the top spin box.
Step 11. In the Identification Profile column, choose the configured ID profile in the spin box.
Step 12. In the Authorized Users and Groups column, click the Selected Groups and Users radio button.
Step 13. Select SGTs in the ISE Secure Group Tags area directly below the radio button.
Step 14. Click Submit.
Figure 6-52 shows the completed access policy that will apply to all users with the Employees SGT assigned.

Figure 6-52 Access Policy with Employees SGT
To add a decryption policy that will decrypt SSL traffic from users with a specific SGT:
Step 15. Navigate to Web Security Manager > Decryption Policies.
Step 16. Click Add Policy.
Step 17. In the Policy Name field, provide a name for the policy.
Step 18. In the Identification Profiles and Users section, choose Select One or More Identification Profiles in the top spin box.
Step 19. In the Identification Profile column, choose the configured ID profile in the spin box.
Step 20. In the Authorized Users and Groups column, click the Selected Groups and Users radio button.
Step 21. Select SGTs in the ISE Secure Group Tags area directly below the radio button.
Step 22. Click Submit.
Figure 6-53 shows the completed access policy that will apply to all users with the Investigate SGT assigned.
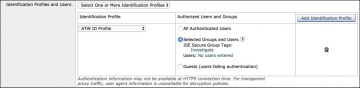
Figure 6-53 Decryption Policy
)
)
)
)
Integrating Stealthwatch and ISE for Identity and Rapid Threat Containment with pxGrid
For years, Cisco had a proven solution known as Cyber Threat Defense (CTD), the main components of which were Cisco ISE and a product called StealthWatch from Lancope. Lancope was acquired by Cisco in December of 2016, and Cisco proceeded to rebrand the product Cisco Stealthwatch. That’s right, folks. Please don’t capitalize that W, as Cisco branding would not be happy.
Regardless of what the product is called, what remains 100 percent true is that Stealthwatch is phenomenal at security analytics and visibility. It works primarily by analyzing NetFlow records from the network and providing analytics around the traffic, hosts, and other telemetry used to decorate the flows.
Why Integrate Stealthwatch and ISE?
Flow analysis itself is incredibly useful for pre- and post-attack analytics. Figure 6-54 shows a basic host report for a client PC in Stealthwatch before integrating it to ISE. This report is just a small taste of what Stealthwatch is able to provide to your security organization and security operations center (SOC) for incident response and alerting.
)
Figure 6-54 Host Report—Pre-ISE Integration
Beginning with version 6.9, Cisco Stealthwatch uses ISE as the primary source for learning passive and active user identities to merge into the flow records used for security analytics. The mechanisms used are exactly the same, whether it is full ISE or the ISE Passive Identity Connector (ISE-PIC), which provides only passive identities (see Chapter 3, “Beyond Basic Network Access Control,” for more information on ISE and passive identity).
Just as with the WSA, the context provided to Stealthwatch can be much richer with full ISE and therefore provide more value by adding endpoint profiles and TrustSec data.
After integrating ISE, the flows will contain much more context about the hosts, including the logged-in user data. Figure 6-55 shows the populated Users & Sessions table after ISE integration.
)
Figure 6-55 Host Report—Post ISE-Integration
Preparing Stealthwatch for pxGrid
To start configuring Stealthwatch for pxGrid, we will generate an “Additional TLS Identity” for the Stealthwatch Management Center (SMC); which is to say we will get a pxGrid certificate from ISE and install it on the SMC.
Unlike the FMC and the WSA, Stealthwatch uses the PKCS12 chain files instead of individual certificates. In other words, it requires the private key, signed certificate, and all the signing root certificates in a single encrypted file.
Step 1. Click the settings cog in the upper-right corner and select Central Management, as shown in Figure 6-56.
Figure 6-56 Settings > Central Management
Step 2. The Stealthwatch Central Management tab or window will open.
Step 3. In the Actions column, click the circle icon next to your Stealthwatch Management Center and click Edit Appliance Configuration, as shown in Figure 6-57.
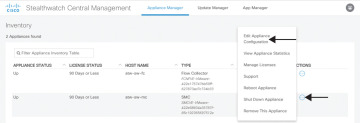
Figure 6-57 Choosing to Edit the Appliance Configuration
Step 4. Scroll down to the section titled Additional SSL/TLS Client Identities.
Step 5. Click Add New.
Step 6. Click Generate CSR.
Step 7. In the Generate a CSR section, fill out the fields for the certificate signing request, as shown in Figure 6-58.
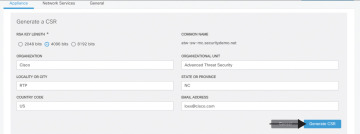
Figure 6-58 Generating the CSR
Step 8. Click Generate CSR, as indicated in Figure 6-58.
Step 9. Save the resulting CSR file to a location where you can easily retrieve it.
Step 10. Open the CSR in your favorite text editor.
Step 11. Copy the contents of the CSR to your clipboard.
In the ISE user interface:
Step 12. Navigate to Administration > pxGrid Services > Certificates.
Step 13. In the I want to spin box, select Generate a single certificate (with certificate signing request).
Step 14. In the Certificate Download format spin box, choose PKCS12 format (including certificate chain; one file for both the certificate chain and key).
Step 15. Enter and confirm a certificate password for the encrypted resulting file.
Step 16. Click Create.
Step 17. Save the resulting p12 file to a location where you can easily retrieve it.
Figure 6-59 shows the completed certificate generation screen in ISE.
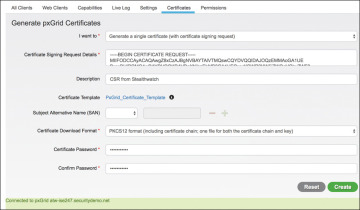
Figure 6-59 Generating the Certificate Chain for Stealthwatch
Back in the Stealthwatch User Interface:
Step 18. In the Friendly Name field, enter a simplified name for the identity certificate.
Step 19. Click Choose File and select the downloaded p12 chain file.
Step 20. After the UI recognizes the chain file, the Bundle Password field appears; enter and confirm the bundle password.
Step 21. Click Add Client Identity.
Figure 6-60 shows the import of the PKCS certificate chain into Stealthwatch.
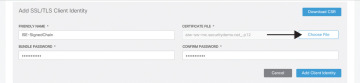
Figure 6-60 Importing the Signed CSR Chain File
Step 22. Click Apply Changes to save the new identity certificate.
)
)
)
)
)
Configuring Stealthwatch for ISE
Now that the pxGrid client identity certificate is imported to Stealthwatch, it is time to configure the ISE integration:
Step 1. On the main Stealthwatch screen, navigate to Deploy > Cisco ISE Configuration, as shown in Figure 6-61.
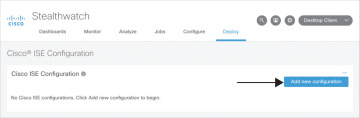
Figure 6-61 Deploy > Cisco ISE Configuration
Step 2. Click Add new configuration.
Step 3. In the Cluster Name field, enter a friendly name for the ISE cube.
Step 4. In the Certificate field, select the pxGrid certificate from the drop-down list.
Step 5. Enter the IP addresses for the primary and secondary pxGrid controllers.
Step 6. Create a username to uniquely identity Stealthwatch in the ISE pxGrid UI.
Step 7. Under Integration options, check the Adaptive Network Control, Static SGT Classifications, and User sessions check boxes.
Step 8. Click Save.
)
Figure 6-62 shows the completed Cisco ISE Configuration Setup screen.
)
Figure 6-62 Configuring the pxGrid Connection
After a bit of time, the Status indicator for the pxGrid connection should change from yellow to green to symbolize that the connection to pxGrid is up and running, as shown in Figure 6-63.
)
Figure 6-63 Connected Status for pxGrid Connection
Figure 6-64 shows the final pxGrid clients screen, where you can see the FMC, WSA, and Stealthwatch clients in the list.
)
Figure 6-64 Final pxGrid Clients Screen
The integration is not only for providing telemetry to Stealthwatch; you can also act during an investigation in Stealthwatch for enforcement through ISE. Stealthwatch 7.0 uses Adaptive Network Control (ANC), whereas previous versions used EPS.
Unlike EPS, which had only two options (Quarantine & Unquarantine), ANC allows you to create many different labels of your choosing, for a variety of actions.
From the ISE user interface:
Step 1. Navigate to Operations > Adaptive Network Control > Policy List.
Step 2. Click Add to create a new label (called a policy).
Step 3. In the Name field, give the policy a name, such as Investigate.
Step 4. In the Action drop-down list, choose the type of CoA that ISE will issue: SHUT_DOWN, PORT_BOUNCE, or QUARANTINE).
Step 5. Click Save.
Figure 6-65 shows two configured ANC labels.
)
Figure 6-65 ANC Labels
After your labels exist, you can include them as conditions in your authorization rules, as shown in Figure 6-66.
)
Figure 6-66 ANC Labels in the Authorization Policy
Now when something looks awry during an incident response, you can assign the ANC label to a host right in the Stealthwatch interface and have ISE take action.
From the Stealthwatch user interface:
Step 1. Click Edit for ISE ANC Policy, as shown in Figure 6-67.
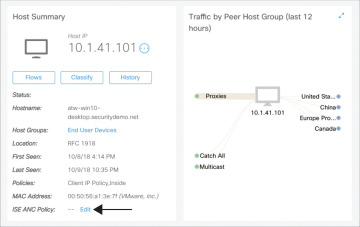
Figure 6-67 Editing the ISE ANC Policy
Step 2. In the Applying ANC policy screen, select your chosen label from the ANC Policy drop-down list, as shown in Figure 6-68.
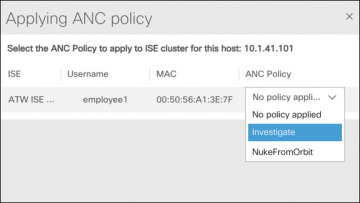
Figure 6-68 Assigning ISE ANC Policy
Step 3. Click Save.
)
)