Installing and Configuring FTD
In this section, you learn the detailed steps involved in installing the FTD software on ASA 5500-X Series hardware. Before you install anything on an ASA, there are some prerequisites. Once you fulfill them, you can perform the remaining tasks of the reimaging process.
Figure 2-3 summarizes the steps involved in reimaging ASA 5500-X hardware to the FTD system software.
)
Figure 2-3 Major Steps in Reimaging ASA 5500-X Series Hardware
Fulfilling Prerequisites
You must fulfill storage and connectivity requirements before you begin reimaging. The following are the storage prerequisites:
To install FTD software, an ASA requires at least 3 GB free space plus additional space to store an FTD boot image (which is usually about 100 MB). See the “Verification and Troubleshooting Tools” section, later in this chapter, to learn how to determine how much free disk space an ASA has.
Make sure the ASA has a solid state drive (SSD) installed. See the “Verification and Troubleshooting Tools” section, later in this chapter, to learn how to determine whether an SSD is installed in an ASA.
The following are the connectivity prerequisites:
Using a console cable, connect your computer to the console port of the ASA that you want to reimage.
Ensure that you have access to TFTP and HTTP servers. You use the TFTP server to copy the firmware and boot image files to the ASA during the reimaging process. You copy the FTD system software from the HTTP server to the ASA. You can use an FTP server in lieu of an HTTP server, but you might find that a basic HTTP server is easier to set up.
Figure 2-4 shows a topology in which the management network is segregated from the data traffic, according to security best practice. An administrator computer is directly connected to an ASA through a console cable, and it also has access to the management network.
)
Figure 2-4 A Simple Topology in Which an ASA Inspects Data Traffic and Keeps Management Traffic Isolated
Figure 2-5 shows the simplest topology that provides both console and IP connectivity between an ASA and a computer and allows an administrator to perform reimaging and basic configuration.
)
Figure 2-5 The Most Basic Connectivity Between an ASA and a Server for Performing Reimaging and Basic Setup
Upgrading Firmware
If you plan to reimage a low-end ASA hardware model, such as 5506-X, 5508-X, or 5516-X, to the FTD software, you must make sure that the firmware version of the ASA is 1.1.8 or greater. See the “Verification and Troubleshooting Tools” section, later in this chapter, to learn how to determine the firmware version.
Follow these steps to upgrade the firmware (ROMMON software) of a low-end ASA model:
Step 1. Download the ROMMON software from software.cisco.com and store it to your TFTP server. Figure 2-6 shows the ROMMON software file asa5500-firmware-1108.SPA that you use to upgrade the firmware of low-end ASA 5500-X Series hardware before you begin the reimaging process.
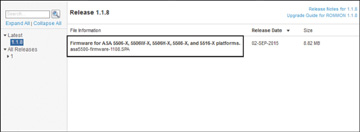
Figure 2-6 The ROMMON Software File Information
Step 2. Copy the file from your TFTP server to your ASA storage. To copy a file from a TFTP server to an ASA, run the following command:
ciscoasa# copy tftp://TFTP_server_address/filename disk0:
Example 2-1 shows that the ROMMON software file asa5500-firmware- 1108.SPA is successfully copied from a TFTP server (IP address 10.1.1.4, for example) to the storage of ASA 5506-X hardware.
Example 2-1 Copying a File from a TFTP Server to ASA Hardware
ciscoasa# copy tftp://10.1.1.4/asa5500-firmware-1108.SPA disk0:

Address or name of remote host [10.1.1.4]?
Source filename [asa5500-firmware-1108.SPA]?
Destination filename [asa5500-firmware-1108.SPA]?

Accessing tftp://10.1.1.4/asa5500-firmware-1108.SPA...!!!!!!!!!!!
Done!
Computed Hash   SHA2: d824bdeecee1308fc64427367fa559e9
                      eefe8f182491652ee4c05e6e751f7a4f
                      5cdea28540cf60acde3ab9b65ff55a9f
                      4e0cfb84b9e2317a856580576612f4af

Embedded Hash   SHA2: d824bdeecee1308fc64427367fa559e9
                      eefe8f182491652ee4c05e6e751f7a4f
                      5cdea28540cf60acde3ab9b65ff55a9f
                      4e0cfb84b9e2317a856580576612f4af

Digital signature successfully validated
Writing file disk0:/asa5500-firmware-1108.SPA...
!!!!!!!!!
9241408 bytes copied in 8.230 secs (1155176 bytes/sec)
ciscoasa#
Step 3. Once the file is copied successfully, begin the upgrade by running the following command:
ciscoasa# upgrade rommon disk0:/asa5500-firmware-1108.SPA
Example 2-2 shows the command to upgrade the firmware of ASA hardware. After the ROMMON software file is verified, the ASA prompts for a confirmation to reload.
Example 2-2 Running the Command to Begin the ROMMON Upgrade
ciscoasa# upgrade rommon disk0:/asa5500-firmware-1108.SPA

Verifying file integrity of disk0:/asa5500-firmware-1108.SPA

Computed Hash   SHA2: d824bdeecee1308fc64427367fa559e9
                      eefe8f182491652ee4c05e6e751f7a4f
                      5cdea28540cf60acde3ab9b65ff55a9f
                      4e0cfb84b9e2317a856580576612f4af

Embedded Hash   SHA2: d824bdeecee1308fc64427367fa559e9
                      eefe8f182491652ee4c05e6e751f7a4f
                      5cdea28540cf60acde3ab9b65ff55a9f
                      4e0cfb84b9e2317a856580576612f4af

Digital signature successfully validated
File Name                     : disk0:/asa5500-firmware-1108.SPA
Image type                    : Release
    Signer Information
        Common Name           : abraxas
        Organization Unit     : NCS_Kenton_ASA
        Organization Name     : CiscoSystems
   Certificate Serial Number : 55831CF6
    Hash Algorithm            : SHA2 512
    Signature Algorithm       : 2048-bit RSA
    Key Version               : A
Verification successful.
Proceed with reload? [confirm]
Step 4. Press the Enter key to confirm. Example 2-3 shows the reloading of the ASA hardware after the firmware upgrade starts.
Example 2-3 Reloading ASA Hardware After an Upgrade Starts
***
*** --- START GRACEFUL SHUTDOWN ---
***
*** Message to all terminals:
***
***   Performing upgrade on rom-monitor.
Shutting down isakmp
Shutting down webvpn
Shutting down sw-module
Shutting down License Controller
Shutting down File system
***
*** --- SHUTDOWN NOW ---
***
*** Message to all terminals:
***
***   Performing upgrade on rom-monitor.
Process shutdown finished
Rebooting... (status 0x9)
..
INIT: Sending processes the TERM signal
Stopping OpenBSD Secure Shell server: sshdno /usr/sbin/sshd found; none killed
Deconfiguring network interfaces... done.
Sending all processes the TERM signal...
Sending all processes the KILL signal...
Deactivating swap...
Unmounting local filesystems...
Rebooting...
During the firmware upgrade process, the ASA reboots automatically a few times. Example 2-4 shows the ASA completing the first two steps of the ROMMON upgrade process. The system reloads every time it completes a step.
Example 2-4 Upgrading the ROMMON Software
Rom image verified correctly
Cisco Systems ROMMON, Version 1.1.01, RELEASE SOFTWARE
Copyright (c) 1994-2014  by Cisco Systems, Inc.
Compiled Mon 10/20/2014 15:59:12.05 by builder

Current image running: Boot ROM0
Last reset cause: PowerCycleRequest
DIMM Slot 0 : Present
INFO: Rommon upgrade state: ROMMON_UPG_START (1)
INFO: Reset code: 0x00002000
Firmware upgrade step 1...
Looking for file 'disk0:/asa5500-firmware-1108.SPA'
Located 'asa5500-firmware-1108.SPA' @ cluster 1608398.
###################################################################################
  ###
##############################################################
Image base 0x77014018, size 9241408
LFBFF signature verified.
Objtype: lfbff_object_rommon (0x800000 bytes @ 0x77014238)
Objtype: lfbff_object_fpga (0xd0100 bytes @ 0x77814258)
INFO: FPGA version in upgrade image: 0x0202
INFO: FPGA version currently active: 0x0202
INFO: The FPGA image is up-to-date.
INFO: Rommon version currently active: 1.1.01.
INFO: Rommon version in upgrade image: 1.1.08.
Active ROMMON: Preferred 0, selected 0, booted 0
Switching SPI access to standby rommon 1.
Please DO NOT reboot the unit, updating ROMMON......
INFO: Duplicating machine state......
Reloading now as step 1 of the rommon upgrade process...

Toggling power on system board...
Rom image verified correctly

Cisco Systems ROMMON, Version 1.1.01, RELEASE SOFTWARE
Copyright (c) 1994-2014  by Cisco Systems, Inc.
Compiled Mon 10/20/2014 15:59:12.05 by builder
Current image running: Boot ROM0
Last reset cause: RP-Reset
DIMM Slot 0 : Present
INFO: Rommon upgrade state: ROMMON_UPG_START (1)
INFO: Reset code: 0x00000008
Active ROMMON: Preferred 0, selected 0, booted 0
Firmware upgrade step 2...
Detected current rommon upgrade is available, continue rommon upgrade process
Rommon upgrade reset 0 in progress
Reloading now as step 2 of the rommon upgrade process...
Step 5. After Step 1 and Step 2 of the upgrade process, when the ASA reloads, the ROMMON version shows 1.1.8 (see Example 2-5). The process, however, is still in progress. When the ASA prompts for a manual or automatic reboot, just wait a few seconds and let the system reboot itself.
Example 2-5 The Last Stage of the ROMMON Upgrade Process
Rom image verified correctly
Cisco Systems ROMMON, Version 1.1.8, RELEASE SOFTWARE
Copyright (c) 1994-2015  by Cisco Systems, Inc.
Compiled Thu 06/18/2015 12:15:56.43 by builders

Current image running: *Upgrade in progress* Boot ROM1
Last reset cause: BootRomUpgrade
DIMM Slot 0 : Present
INFO: Rommon upgrade state: ROMMON_UPG_START (1)
INFO: Reset code: 0x00000010
PROM B: stopping boot timer
Active ROMMON: Preferred 0, selected 0, booted 1
INFO: Rommon upgrade state: ROMMON_UPG_TEST

!!!!!!!!!!!!!!!!!!!!!!!!!!!!!!!!!!!!!!!!!!!!!!!!!!!!!!!!!!!!!!!!!!!!!!!!!
!! Please manually or auto boot ASAOS now to complete firmware upgrade !!
!!!!!!!!!!!!!!!!!!!!!!!!!!!!!!!!!!!!!!!!!!!!!!!!!!!!!!!!!!!!!!!!!!!!!!!!!

Platform ASA5506 with 4096 Mbytes of main memory
MAC Address: a4:6c:2a:e4:6b:bf
Using default Management Ethernet Port: 0

Use BREAK or ESC to interrupt boot.
Use SPACE to begin boot immediately.
Boot in 5 seconds.
Example 2-6 shows the confirmation message you get for a successful ROMMON upgrade, after the final reboot. At this stage, the ROMMON software is fully upgraded, and you are ready to begin the next step of the reimage process.
Example 2-6 Completion of a Successful Upgrade
Located '.boot_string' @ cluster 1607965.

#
Attempt autoboot: "boot disk0:/asa961-50-lfbff-k8.spa"
Located 'asa961-50-lfbff-k8.spa' @ cluster 10.

########################################################################################
  ######################################################################################
  ######################################################################################
  #################################################
LFBFF signature verified.
INIT: version 2.88 booting
Starting udev
Configuring network interfaces... done.
Populating dev cache
dosfsck 2.11, 12 Mar 2005, FAT32, LFN
There are differences between boot sector and its backup.
Differences: (offset:original/backup)
  65:01/00
  Not automatically fixing this.
Starting check/repair pass.
Starting verification pass.
/dev/sdb1: 104 files, 811482/1918808 clusters
dosfsck(/dev/sdb1) returned 0
Mounting /dev/sdb1
Setting the offload CPU count to 0
IO Memory Nodes: 1
IO Memory Per Node: 205520896 bytes

Global Reserve Memory Per Node: 314572800 bytes Nodes=1

LCMB: got 205520896 bytes on numa-id=0, phys=0x10d400000, virt=0x2aaaab000000
LCMB: HEAP-CACHE POOL got 314572800 bytes on numa-id=0, virt=0x7fedbc200000
Processor memory:   1502270072

Compiled on Fri 04-Mar-16 10:50 PST by builders
Total NICs found: 14
i354 rev03 Gigabit Ethernet @ irq255 dev 20 index 08 MAC: a46c.2ae4.6bbf
ivshmem rev03 Backplane Data Interface     @ index 09 MAC: 0000.0001.0002
en_vtun rev00 Backplane Control Interface  @ index 10 MAC: 0000.0001.0001
en_vtun rev00 Backplane Int-Mgmt Interface     @ index 11 MAC: 0000.0001.0003
en_vtun rev00 Backplane Ext-Mgmt Interface     @ index 12 MAC: 0000.0000.0000
en_vtun rev00 Backplane Tap Interface     @ index 13 MAC: 0000.0100.0001
Rom-monitor was successfully upgraded.
Verify the activation-key, it might take a while...
.
.
! Licensing and legal information are omitted for brevity
.
.
                Cisco Systems, Inc.
                170 West Tasman Drive
                San Jose, California 95134-1706

Reading from flash...
!.
Cryptochecksum (unchanged): 868f669d 9e09ca8b e91c32de 4ee8fd7f

INFO: Power-On Self-Test in process.
.......................
INFO: Power-On Self-Test complete.
INFO: Starting HW-DRBG health test...
INFO: HW-DRBG health test passed.

INFO: Starting SW-DRBG health test...
INFO: SW-DRBG health test passed.
Type help or '?' for a list of available commands.
ciscoasa>
When an ASA is running, you can also manually check its ROMMON software version, as discussed in the “Verification and Troubleshooting Tools” section, later in this chapter. Example 2-7 shows that the current firmware version is upgraded to 1.1.8.
Example 2-7 The Upgraded Firmware Version
ciscoasa> enable
Password: *****
ciscoasa# show module

Mod  Card Type                                    Model              Serial No.
---- -------------------------------------------- ------------------ -----------
   1 ASA 5506-X with FirePOWER services, 8GE, AC, ASA5506            JAD191100HG
 sfr Unknown                                      N/A                JAD191100HG

Mod  MAC Address Range                 Hw Version   Fw Version   Sw Version
---- --------------------------------- ------------ ------------ ---------------
   1 a46c.2ae4.6bbf to a46c.2ae4.6bc8  1.0          1.1.8        9.6(1)50
 sfr a46c.2ae4.6bbe to a46c.2ae4.6bbe  N/A          N/A

Mod  SSM Application Name           Status           SSM Application Version
---- ------------------------------ ---------------- --------------------------

Mod  Status             Data Plane Status     Compatibility
---- ------------------ --------------------- -------------
   1 Up Sys             Not Applicable
 sfr Unresponsive       Not Applicable

ciscoasa#
)
Installing the Boot Image
You begin the setup of the FTD software from the command line interface (CLI) of a boot image. To access the CLI of the boot image, you need to reload the ASA with the FTD boot. This section discusses the steps that are necessary to reload an ASA with an appropriate boot image on any ASA 5500-X Series hardware:
Step 1. Download the appropriate boot image for your ASA hardware:
For low-end ASA hardware, use the *.lfbff file.
For midrange hardware, use the *.cdisk file.
Figure 2-7 shows the boot image file ftd-boot-9.6.2.0.lfbff that you use during the reimaging of ASA 5506-X, 5508-X, or 5516-X hardware.

Figure 2-7 The *.lfbff Boot Image File for Low-End ASA 5500-X Series Hardware
Figure 2-8 shows the boot image file ftd-boot-9.6.2.0.cdisk that you use during the reimaging of ASA 5512-X, 5515-X, 5525-X, 5545-X, or 5555-X hardware.
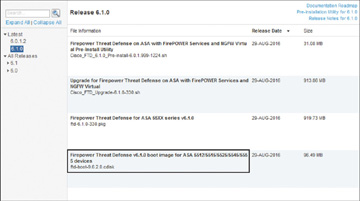
Figure 2-8 The *.cdisk Boot Image File for Midrange ASA 5500-X Series Hardware
Step 2. Reload the ASA. As shown in Example 2-8, the ASA shuts down all its processes before it gracefully reboots.
Example 2-8 Reloading ASA Hardware
ciscoasa# reload
Proceed with reload? [confirm]
ciscoasa#
***
*** --- START GRACEFUL SHUTDOWN ---
Shutting down isakmp
Shutting down webvpn
Shutting down sw-module
Shutting down License Controller
Shutting down File system
***
*** --- SHUTDOWN NOW ---
Process shutdown finished
Rebooting... (status 0x9)
..
INIT: Sending processes the TERM signal
Stopping OpenBSD Secure Shell server: sshdno /usr/sbin/sshd found; none killed
Deconfiguring network interfaces... done.
Sending all processes the TERM signal...
Sending all processes the KILL signal...
Deactivating swap...
Unmounting local filesystems...
Rebooting...
Step 3. Interrupt the bootup process by pressing the Esc key. Example 2-9 shows that the bootup process is interrupted and the ASA enters ROMMON mode.
Example 2-9 Interrupting the Bootup Process
Rom image verified correctly

Cisco Systems ROMMON, Version 1.1.8, RELEASE SOFTWARE
Copyright (c) 1994-2015  by Cisco Systems, Inc.
Compiled Thu 06/18/2015 12:15:56.43 by builders

Current image running: Boot ROM1
Last reset cause: PowerCycleRequest
DIMM Slot 0 : Present

Platform ASA5506 with 4096 Mbytes of main memory
MAC Address: a4:6c:2a:e4:6b:bf
Using default Management Ethernet Port: 0

Use BREAK or ESC to interrupt boot.
Use SPACE to begin boot immediately.
Boot in 7 seconds.
Boot interrupted.
rommon 1 >
Step 4. To see the ROMMON configuration mode’s limited command options, run the help command. Example 2-10 shows the available commands in the ROMMON configuration mode, with the commands used to install the boot image highlighted.
Example 2-10 Available Commands in the ROMMON Configuration Mode
rommon 1 > help
?                   Display this help menu
address             Set the local IP address
boot                Boot an application program
confreg             Configuration register contents display and management
console             Console BAUD rate display and configuration
dev                 Display a list of available file system devices
dir                 File directory display command
erase               erase the specified file system
file                Set the application image file path/name to be TFTPed
gateway             Set the default gateway IP address
help                "help" for this menu
                    "help <command>" for specific command information
history             Show the command line history
netmask             Set the IP subnet mask value
ping                Test network connectivity with ping commands
server              Set the TFTP server IP address
show                Display system device and status information
tftpdnld            Download and run the image defined by "FILE"
reboot              Reboot the system
reload              Reboot the system
repeat              Repeat a CLI command
reset               Reboot the system
set                 Display the configured environment variables
sync                Save the environment variables to persistent storage
unset               Clear a configured environment variable
Step 5. Configure the network by using the commands shown in Example 2-11. You must configure these options to ensure successful network communication between the ASA, FMC, and other servers.
Example 2-11 Commands to Configure the Network Settings in ROMMON Mode
rommon 2 > address 10.1.1.21
rommon 3 > netmask 255.255.255.0
rommon 4 > gateway 10.1.1.1
rommon 5 > server 10.1.1.4
Step 6. Test the connectivity from the ASA to the TFTP server where the image files are stored, as shown in Example 2-12. You get confirmation that the ASA can communicate with the TFTP server.
Example 2-12 A Successful ping Test from the ASA to the TFTP Server
rommon 6 > ping 10.1.1.4
Sending 10, 32-byte ICMP Echoes to 10.1.1.4 timeout is 4 seconds
!!!!!!!!!!
Success rate is 100 percent (10/10)
Step 7. Once connectivity is established, provide the name of the boot image file you want to download from the TFTP server, save the changes, and begin the download. Example 2-13 shows that the ASA 5506-X has successfully downloaded the boot image file ftd-boot-9.6.2.0.lfbff from a TFTP server.
Example 2-13 Commands to Select and Download a File from a TFTP Server to ASA Hardware
rommon 7 > file ftd-boot-9.6.2.0.lfbff
rommon 8 > sync
rommon 9 > tftpdnld
             ADDRESS: 10.1.1.21
             NETMASK: 255.255.255.0
             GATEWAY: 10.1.1.1
              SERVER: 10.1.1.4
               IMAGE: ftd-boot-9.6.2.0.lfbff
             MACADDR: a4:6c:2a:e4:6b:bf
           VERBOSITY: Progress
               RETRY: 20
          PKTTIMEOUT: 60
             BLKSIZE: 1460
            CHECKSUM: Yes
                PORT: GbE/1
             PHYMODE: Auto Detect

Receiving ftd-boot-9.6.2.0.lfbff from 10.1.1.4!!!!!!!!!!!!!!!!!!!!!!!!!!!!!!!!!!!
  !!!!!!!!!!!!!!!!!!!!!!!!!!!!!!!!!!!!!!!!!!!!!!!!!!!!!!!!!!!!!!!!!!!!!!!!!!!!!!!!!
  !!!!!!!!!!!!!!!!!!!!!!!!!!!!!!!!!!!!!!!!!!!!!!!!!!!!!!!!!!!!!!!!!!!!!!!!!!!!!!!!!
  !!!!!!!!!!!!!!!!!!!!!!!!!!!!!!!!!!!!!!!!!!!!!!!!!!!!!!!!!!!!!!!!!!!!!!!!!!!!!!!!!
  !!!!!!!!!!!!!!!!!!!!!!!!!!!!!!!!!!!!!!!!!!!!!!!!!!!!!!!!!!!!!!!!!!!!!!!!!!!!!!!!!
  !!!!!!!!!!!!!!!!!!!!!!!!!!!!!!!!!!!!!!!!!
File reception completed.
The ASA boots up automatically with the FTD boot CLI, as shown in Example 2-14.
Example 2-14 Bootup Process of ASA Hardware with an FTD Boot Image
Boot buffer bigbuf=348bd018
Boot image size = 100921600 (0x603f100) bytes
[image size]      100921600
[MD5 signature]    0264697f6f1942b9bf80f820fb209ad5
LFBFF signature verified.
INIT: version 2.88 booting
Starting udev
Configuring network interfaces... done.
Populating dev cache
Detected PID ASA5506.
Found device serial number JAD191100HG.
Found USB flash drive /dev/sdb
Found hard drive(s):  /dev/sda
fsck from util-linux 2.23.2
dosfsck 2.11, 12 Mar 2005, FAT32, LFN
There are differences between boot sector and its backup.
Differences: (offset:original/backup)
  65:01/00
  Not automatically fixing this.
/dev/sdb1: 52 files, 811482/1918808 clusters
Launching boot CLI ...
Configuring network interface using static IP
Bringing up network interface.
Depending on your network, this might take a couple of minutes when using DHCP...
ifup: interface lo already configured
Using IPv4 address: 10.1.1.21
INIT: Starting system message bus: dbus.
Starting OpenBSD Secure Shell server: sshd
  generating ssh RSA key...
  generating ssh ECDSA key...
  generating ssh DSA key...
done.
Starting Advanced Configuration and Power Interface daemon: acpid.
acpid: starting up
acpid: 1 rule loaded
acpid: waiting for events: event logging is off
Starting ntpd: done
Starting syslog-ng:[2016-09-19T19:43:24.781411] Connection failed; fd='15',
  server='AF_INET(127.128.254.1:514)', local='AF_INET(0.0.0.0:0)', error='Network is
  unreachable (101)'
[2016-09-19T19:43:24.781508] Initiating connection failed, reconnecting;
  time_reopen='60'
.
Starting crond: OK


            Cisco FTD Boot 6.0.0 (9.6.2.)
              Type ? for list of commands
ciscoasa-boot>
Step 8. Optionally press the ? key to see the list of the available commands on the FTD boot CLI, as shown in Example 2-15. (In the next section of this chapter, you will see the commands highlighted in this example used to install an FTD software system image.)
Example 2-15 The Command Options on the FTD Boot CLI
ciscoasa-boot> ?
    show             => Display system information. Enter show ? for options
    system           => Control system operation
    setup            => System Setup Wizard
    support          => Support information for TAC
    delete           => Delete files
    ping             => Ping a host to check reachability
    traceroute       => Trace the route to a remote host
    exit             => Exit the session
    help             => Get help on command syntax
ciscoasa-boot>
)
)
Installing the System Software
Installing the FTD software is the last step of the reimaging process. This section describes the steps to install the FTD system software on any ASA 5500-X series hardware:
Step 1. Download the FTD system software package file from software.cisco.com and copy it to an HTTP or FTP server. Figure 2-9 shows the FTD system software package ftd-6.1.0-330.pkg that you install on any low-end or midrange ASA 5500-X Series hardware during the reimaging process.
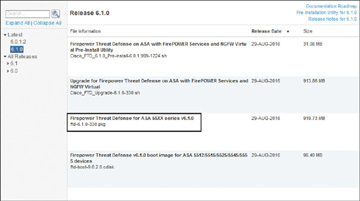
Figure 2-9 The *.pkg File Installed on Any Low-End or Midrange ASA Hardware Models
Step 2. As shown in Example 2-16, run the setup command to configure or update the network settings so that the ASA can download the FTD system software package from the HTTP server. During the installation of the boot image, you configured the network settings. Now you either verify the existing configuration or provide any missing information that was not entered before.
Example 2-16 A Complete Walk-through of the Network Setup Process
ciscoasa-boot> setup

                Welcome to Cisco FTD Setup
                  [hit Ctrl-C to abort]
                Default values are inside []

Enter a hostname [ciscoasa]:
Do you want to configure IPv4 address on management interface?(y/n) [Y]:
Do you want to enable DHCP for IPv4 address assignment on management interface?(y/n) [N]:
Enter an IPv4 address [10.1.1.21]:
Enter the netmask [255.255.255.0]:
Enter the gateway [10.1.1.1]:
Do you want to configure static IPv6 address on management interface?(y/n) [N]:
Stateless autoconfiguration will be enabled for IPv6 addresses.
Enter the primary DNS server IP address: 10.1.1.8
Do you want to configure Secondary DNS Server? (y/n) [n]:
Do you want to configure Local Domain Name? (y/n) [n]:
Do you want to configure Search domains? (y/n) [n]:
Do you want to enable the NTP service? [Y]:
Enter the NTP servers separated by commas: 10.1.1.9

Please review the final configuration:
Hostname:               ciscoasa
Management Interface Configuration

IPv4 Configuration:     static
        IP Address:     10.1.1.21
        Netmask:        255.255.255.0
        Gateway:        10.1.1.1

IPv6 Configuration:     Stateless autoconfiguration

DNS Configuration:
        DNS Server:     10.1.1.8

NTP configuration:      10.1.1.9

CAUTION:
You have selected IPv6 stateless autoconfiguration, which assigns a global address
based on network prefix and a device identifier. Although this address is unlikely
to change, if it does change, the system will stop functioning correctly.
We suggest you use static addressing instead.
Apply the changes?(y,n) [Y]:
Configuration saved successfully!
Applying...
Restarting network services...
Done.
Press ENTER to continue...
ciscoasa-boot>
Step 3. Test the connectivity, as shown in Example 2-17. This example also shows that the ASA can successfully ping from the FTD boot CLI to the HTTP server.
Example 2-17 ping Test Between the ASA and the HTTP Server
ciscoasa-boot> ping 10.1.1.4
PING 10.1.1.4 (10.1.1.4) 56(84) bytes of data.
64 bytes from 10.1.1.4: icmp_seq=1 ttl=64 time=0.364 ms
64 bytes from 10.1.1.4: icmp_seq=2 ttl=64 time=0.352 ms
64 bytes from 10.1.1.4: icmp_seq=3 ttl=64 time=0.326 ms
64 bytes from 10.1.1.4: icmp_seq=4 ttl=64 time=0.313 ms
^C
--- 10.1.1.4 ping statistics ---
4 packets transmitted, 4 received, 0% packet loss, time 2997ms
rtt min/avg/max/mdev = 0.313/0.338/0.364/0.030 ms

ciscoasa-boot>
Step 4. Download the FTD system software package from the HTTP server, as shown in Example 2-18. After a successful download, the file is extracted automatically.
Example 2-18 Downloading the FTD System Software
ciscoasa-boot> system install http://10.1.1.4/ftd-6.1.0-330.pkg

######################## WARNING ############################
# The content of disk0: will be erased during installation! #
#############################################################

Do you want to continue? [y/N] Y
Erasing disk0 ...
Verifying
Downloading...
Step 5. When prompted, press Y to start the upgrade process. Example 2-19 shows the extraction of the FTD system software package ftd-6.1.0-330.pkg and the beginning of the upgrade process.
Example 2-19 Starting the Upgrade Process
Extracting.....
Package Detail
        Description:                    Cisco ASA-FTD 6.1.0-330 System Install
        Requires reboot:                Yes

Do you want to continue with upgrade? [y]:
Warning: Please do not interrupt the process or turn off the system.
Doing so might leave system in unusable state.

Starting upgrade process ...
Populating new system image..
Step 6. When the image is populated and the system prompts you to reboot the system, press Enter to reboot. Example 2-20 shows the ASA hardware rebooting after the image is populated.
Example 2-20 Rebooting the ASA Hardware to Complete the Upgrade
Reboot is required to complete the upgrade. Press 'Enter' to reboot the system.

Broadcast mStopping OpenBSD Secure Shell server: sshdstopped /usr/sbin/sshd (pid 1723)
.
Stopping Advanced Configuration and Power Interface daemon: stopped /usr/sbin/acpid
  (pid 1727)
acpid: exiting

acpid.
Stopping system message bus: dbus.
Stopping ntpd: stopped process in pidfile '/var/run/ntp.pid' (pid 1893)
done
Stopping crond: OKs
Deconfiguring network interfaces... done.
Sending all processes the TERM signal...
Sending all processes the KILL signal...
Deactivating swap...
Unmounting local filesystems...
Rebooting...

Rom image verified correctly

Cisco Systems ROMMON, Version 1.1.8, RELEASE SOFTWARE
Copyright (c) 1994-2015  by Cisco Systems, Inc.
Compiled Thu 06/18/2015 12:15:56.43 by builders

Current image running: Boot ROM1
Last reset cause: PowerCycleRequest
DIMM Slot 0 : Present

Platform ASA5506 with 4096 Mbytes of main memory
MAC Address: a4:6c:2a:e4:6b:bf
Using default Management Ethernet Port: 0

Use BREAK or ESC to interrupt boot.
Use SPACE to begin boot immediately.
Boot in 5 seconds.


Located '.boot_string' @ cluster 260097.
#
Attempt autoboot: "boot disk0:os.img"
Located 'os.img' @ cluster 235457.

##############################################################################################
  ############################################################################################
  ############################################################################################
  ############################################################################################
  ############################################################################################
  #####################################
LFBFF signature verified.
INIT: version 2.88 booting
Starting udev
Configuring network interfaces... done.
Populating dev cache
Detected PID ASA5506.
Found device serial number JAD191100HG.
Found USB flash drive /dev/sdb
Found hard drive(s):  /dev/sda
fsck from util-linux 2.23.2
dosfsck 2.11, 12 Mar 2005, FAT32, LFN
/dev/sdb1: 7 files, 24683/1919063 clusters
After bootup, the initialization of the FTD software begins automatically. Example 2-21 shows the launch of FTD software and the execution of various scripts throughout the installation process.
Example 2-21 The FTD Initialization Process
Use ESC to interrupt boot and launch boot CLI.
Use SPACE to launch Cisco FTD immediately.
Cisco FTD launch in 21 seconds ...

Cisco FTD launch in 0 seconds ...
Running on kenton
Mounting disk partitions ...
Initializing Threat Defense ...                                       [  OK  ]
Starting system log daemon...                                         [  OK  ]
Stopping mysql...
Sep 19 20:29:33 ciscoasa SF-IMS[2303]: [2303] pmtool:pmtool [ERROR] Unable to connect
  to UNIX socket at /ngfw/var/sf/run/PM_Control.sock: No such file or directory
Starting mysql...
Sep 19 20:29:33 ciscoasa SF-IMS[2304]: [2304] pmtool:pmtool [ERROR] Unable to connect
  to UNIX socket at /ngfw/var/sf/run/PM_Control.sock: No such file or directory
Flushing all current IPv4 rules and user defined chains: ...success
Clearing all current IPv4 rules and user defined chains: ...success
Applying iptables firewall rules:
Flushing chain 'PREROUTING'
.
! Omitted the messages related to iptables flushing for brevity
.
Flushing chain 'OUTPUT'
Applying rules successed
Starting nscd...
mkdir: created directory '/var/run/nscd'                              [  OK  ]
Starting , please wait...grep: /ngfw/etc/motd: No such file or directory
...complete.
Firstboot detected, executing scripts
Executing S01reset_failopen_if                                        [  OK  ]
Executing S01virtual-machine-reconfigure                              [  OK  ]
Executing S02aws-pull-cfg                                             [  OK  ]
Executing S02configure_onbox                                          [  OK  ]
Executing S04fix-httpd.sh                                             [  OK  ]
Executing S05set-mgmnt-port                                           [  OK  ]
Executing S06addusers                                                 [  OK  ]
Executing S07uuid-init                                                [  OK  ]
Executing S08configure_mysql                                          [  OK  ]

************ Attention *********

   Initializing the configuration database.  Depending on available
   system resources (CPU, memory, and disk), this may take 30 minutes
   or more to complete.

************ Attention *********

Executing S09database-init                                            [  OK  ]
Executing S11database-populate                                        [  OK  ]
Executing S12install_infodb                                           [  OK  ]
Executing S15set-locale.sh                                            [  OK  ]
Executing S16update-sensor.pl                                         [  OK  ]
Executing S19cert-tun-init                                            [  OK  ]
Executing S20cert-init                                                [  OK  ]
Executing S21disable_estreamer                                        [  OK  ]
Executing S25create_default_des.pl                                    [  OK  ]
Executing S30init_lights_out_mgmt.pl                                  [  OK  ]
Executing S40install_default_filters.pl                               [  OK  ]
Executing S42install_default_dashboards.pl                            [  OK  ]
Executing S43install_default_report_templates.pl                      [  OK  ]
Executing S44install_default_app_filters.pl                           [  OK  ]
Executing S45install_default_realms.pl                                [  OK  ]
Executing S47install_default_sandbox_EO.pl                            [  OK  ]
Executing S50install-remediation-modules                              [  OK  ]
Executing S51install_health_policy.pl                                 [  OK  ]
Executing S52install_system_policy.pl                                 [  OK  ]
Executing S53change_reconciliation_baseline.pl                        [  OK  ]
Executing S70remove_casuser.pl                                        [  OK  ]
Executing S70update_sensor_objects.sh                                 [  OK  ]
Executing S85patch_history-init                                       [  OK  ]
Executing S90banner-init                                              [  OK  ]
Executing S95copy-crontab                                             [  OK  ]
Executing S96grow_var.sh                                              [  OK  ]
Executing S96install_vmware_tools.pl                                  [  OK  ]

********** Attention **********

   Initializing the system's localization settings.  Depending on available
   system resources (CPU, memory, and disk), this may take 10 minutes
   or more to complete.
********** Attention **********
Executing S96localize-templates                                       [  OK  ]
Executing S96ovf-data.pl                                              [  OK  ]
Executing S97compress-client-resources                                [  OK  ]
Executing S97create_platinum_forms.pl                                 [  OK  ]
Executing S97install_cas                                              [  OK  ]
Executing S97install_cloud_support.pl                                 [  OK  ]
Executing S97install_geolocation.pl                                   [  OK  ]
Executing S97install_ssl_inspection.pl                                [  OK  ]
Executing S97update_modprobe.pl                                       [  OK  ]
Executing S98check-db-integrity.sh                                    [  OK  ]
Executing S98htaccess-init                                            [  OK  ]
Executing S98is-sru-finished.sh                                       [  OK  ]
Executing S99correct_ipmi.pl                                          [  OK  ]
Executing S99start-system                                             [  OK  ]
Executing S99z_db_restore                                             [  OK  ]
Executing S99_z_cc-integrity.sh                                       [  OK  ]
Firstboot scripts finished.
Configuring NTP...                                                    [  OK  ]
fatattr: can't open '/mnt/disk0/.private2': No such file or directory
fatattr: can't open '/mnt/disk0/.ngfw': No such file or directory
Model reconfigure detected, executing scripts
Pinging mysql
Found mysql is running
Executing 45update-sensor.pl                                          [  OK  ]
Executing 55recalculate_arc.pl                                        [  OK  ]
Starting xinetd:
Mon Sep 19 20:59:07 UTC 2016
Starting MySQL...
Pinging mysql
Pinging mysql, try 1
Pinging mysql, try 2
Found mysql is running
Running initializeObjects...
Stopping MySQL...
Killing mysqld with pid 22285
Wait for mysqld to exit\c
 done
Mon Sep 19 20:59:32 UTC 2016

Starting sfifd...                                                     [  OK  ]
Starting Cisco ASA5506-X Threat Defense, please wait...No PM running!
...started.
INIT: Starting system message bus: dbus.
Starting OpenBSD Secure Shell server: sshd
  generating ssh RSA key...
  generating ssh ECDSA key...
  generating ssh DSA key...
done.
Starting Advanced Configuration and Power Interface daemon: acpid.
Starting crond: OK
Sep 19 20:59:42 ciscoasa SF-IMS[22997]: [22997] init script:system [INFO] pmmon
  Setting affinity to 0-3...
pid 22993's current affinity list: 0-3
pid 22993's new affinity list: 0-3
Sep 19 20:59:42 ciscoasa SF-IMS[22999]: [22999] init script:system [INFO] pmmon The
  Process Manager is not running...
Sep 19 20:59:42 ciscoasa SF-IMS[23000]: [23000] init script:system [INFO] pmmon
  Starting the Process Manager...
Sep 19 20:59:42 ciscoasa SF-IMS[23001]: [23001] pm:pm [INFO] Using model number 75J

IO Memory Nodes: 1
IO Memory Per Node: 205520896 bytes

Global Reserve Memory Per Node: 314572800 bytes Nodes=1

LCMB: got 205520896 bytes on numa-id=0, phys=0x2400000, virt=0x2aaaac200000
LCMB: HEAP-CACHE POOL got 314572800 bytes on numa-id=0, virt=0x7fa17d600000
Processor memory:   1583098718

Compiled on Tue 23-Aug-16 19:42 PDT by builders

Total NICs found: 14
.
! Omitted the MAC addresses, licensing and legal messages for brevity
.
                Cisco Systems, Inc.
                170 West Tasman Drive
                San Jose, California 95134-1706

Reading from flash...
!
Cryptochecksum (changed): f410387e 8aab8a4e f71eb8a9 f8b37ef9

INFO: Power-On Self-Test in process.
.......................................................................
INFO: Power-On Self-Test complete.

INFO: Starting HW-DRBG health test...
INFO: HW-DRBG health test passed.

INFO: Starting SW-DRBG health test...
INFO: SW-DRBG health test passed.
Type help o '?' for a list
Cisco ASA5506-X Threat Defense v6.1.0 (build 330)
firepower login:
Step 7. At the Firepower login prompt, which indicates that the installation is complete, enter the default login credentials (username admin and password Admin123), as shown in Example 2-22.
Example 2-22 Entering the Default Login Credentials
firepower login: admin
Password: Admin123
Step 8. When prompted to accept the End User License Agreement (EULA), press Enter to display the agreement and to accept it. Example 2-23 shows the system prompts for the EULA. The detailed legal messages are omitted from this example for brevity.
Example 2-23 Agreeing to the EULA
You must accept the EULA to continue.
Press <ENTER> to display the EULA:
END USER LICENSE AGREEMENT
.
.
!The EULA messages are omitted for brevity
.
.
.Please enter 'YES' or press <ENTER> to AGREE to the EULA:
Step 9. As the system initialization process begins, change the password for the admin user and set up the network by pressing Enter to accept the default values in brackets ([ ]). Example 2-24 illustrates the configuration of the password and network settings.
Example 2-24 Configuring the Network After the First Login to FTD
System initialization in progress.  Please stand by.
You must change the password for 'admin' to continue.
Enter new password:
Confirm new password:
You must configure the network to continue.
You must configure at least one of IPv4 or IPv6.
Do you want to configure IPv4? (y/n) [y]:
Do you want to configure IPv6? (y/n) [n]:
Configure IPv4 via DHCP or manually? (dhcp/manual) [manual]:
Enter an IPv4 address for the management interface [192.168.45.45]: 10.1.1.21
Enter an IPv4 netmask for the management interface [255.255.255.0]:
Enter the IPv4 default gateway for the management interface [192.168.45.1]: 10.1.1.1
Enter a fully qualified hostname for this system [firepower]:
Enter a comma-separated list of DNS servers or 'none' []:
Enter a comma-separated list of search domains or 'none' []:
If your networking information has changed, you will need to reconnect.
For HTTP Proxy configuration, run 'configure network http-proxy'
Step 10. When the question about local management (also known as on-box management) appears, enter no.
Example 2-25 shows the configurations related to how to manage this FTD and how to deploy it in the network. In this example, the system is configured to be managed by a dedicated management appliance (the FMC) and is deployed in routed mode.
Example 2-25 Configuring the Deployment Type and Modes
Manage the device locally? (yes/no) [yes]: no
Configure firewall mode? (routed/transparent) [routed]:
Configuring firewall mode ...
Update policy deployment information
    - add device configuration
    - add network discovery
    - add system policy
You can register the sensor to a Firepower Management Center and use the
Firepower Management Center to manage it. Note that registering the sensor
to a Firepower Management Center disables on-sensor Firepower Services
management capabilities.

When registering the sensor to a Firepower Management Center, a unique
alphanumeric registration key is always required.  In most cases, to register
a sensor to a Firepower Management Center, you must provide the hostname or
the IP address along with the registration key.
'configure manager add [hostname | ip address ] [registration key ]'

However, if the sensor and the Firepower Management Center are separated by a
NAT device, you must enter a unique NAT ID, along with the unique registration
key.
'configure manager add DONTRESOLVE [registration key ] [ NAT ID ]'

Later, using the web interface on the Firepower Management Center, you must
use the same registration key and, if necessary, the same NAT ID when you add
this sensor to the Firepower Management Center.
>
The > prompt at the end of Example 2-25 confirms that the initial network configuration is complete. The next step is to verify network connectivity on the management interface and then begin the registration process. (Chapter 6: “The Firepower Management Network,” explains the management connection, and Chapter 7, “Firepower Licensing and Registration,” describes the registration process.)
)