Container Infrastructure Configuration and Instantiation
This section explains and provides procedures to instantiate different types of containers and to access, configure, manage, and orchestrate them. It also provides detailed steps to deploy and manage applications in the containers.
Guest Shell
Just as with OAC, Cisco Nexus 3000/9000 Series devices support access to an isolated execution environment, called the Guest Shell, which is running within a secure Linux Container (sLXC), as illustrated in Figure 7-3. Under the hood, the Guest Shell is just a libvirt-managed LXC container. This Guest Shell is based on CentOS 7 and can be managed using traditional Linux commands.
)
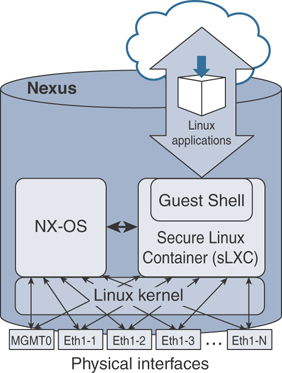
Figure 7-3 Guest Shell in NX-OS
The Guest Shell has various functions and offers key benefits that aid developers in building and hosting applications in Nexus platforms, such as providing access to the network, NX-OS CLI, bootflash filesystem, and above all, the ability to install Python scripts and Linux applications.
Guest Shell OVA File
In Nexus 3000 and 9000 switches, the .ova file for the default version of Guest Shell is integrated with the NX-OS image, and as previously discussed, you do not have to download and install an .ova to enable it.
Deployment Model and Workflow
It is simple to activate Guest Shell in supported platforms, and it can be done with one command, as shown in Example 7-1. The Guest Shell needs to be explicitly activated only in the first generation of the Nexus 3000 platform that came with 4 GB RAM. In later generations of Nexus 3000 and Nexus 9000 platforms, Guest Shell is enabled by default.
This guestshell enable command does the following:
Creates a virtual service instance
Extracts the .ova file built into NX-OS
Validates the contents in the file
Creates a virtual environment in the device
Instantiates the Guest Shell container
Example 7-1 Enable Guest Shell in NX-OS
N3K-C3548P# guestshell enable
2019 Sep 12 02:04:00 N3K-C3548P %$ VDC-1 %$ %VMAN-2-INSTALL_STATE: Installing
  virtual service 'guestshell+'
N3K-C3548P#
N3K-C3548P# show virtual-service list
Virtual Service List:
Name                    Status             Package Name
-----------------------------------------------------------------------
guestshell+             Activating         guestshell.ova
N3K-C3548P#
2019 Sep 12 02:04:55 N3K-C3548P %$ VDC-1 %$ %VMAN-2-ACTIVATION_STATE: Successfully
  activated virtual service 'guestshell+'
N3K-C3548P# show virtual-service list
Virtual Service List:
Name                    Status             Package Name
-----------------------------------------------------------------------
guestshell+             Activated          guestshell.ova
N3K-C3548P#
To know the resources allocated to the shell, use the show guestshell command. As you can see in Example 7-2, it reports the operational state of the shell, disk, memory, and CPU resource reservation, and it reports the filesystems/devices mounted in the shell. The utilization command shown next shows usage of memory, CPU, and storage resources in real time.
Example 7-2 Guest Shell Status and Resource Allocation
N3K-C3548P#
N3K-C3548P# show guestshell
Virtual service guestshell+ detail
  State                 : Activated
  Package information
    Name                : guestshell.ova
    Path                : /isanboot/bin/guestshell.ova
    Application
      Name              : GuestShell
      Installed version : 2.4(0.0)
      Description       : Cisco Systems Guest Shell
    Signing
      Key type          : Cisco release key
      Method            : SHA-1
    Licensing
      Name              : None
      Version           : None
  Resource reservation
    Disk                : 250 MB
    Memory              : 256 MB
    CPU                 : 1% system CPU

  Attached devices
    Type              Name        Alias
    ---------------------------------------------
    Disk              _rootfs
    Disk              /cisco/core
    Serial/shell
    Serial/aux
    Serial/Syslog                 serial2
    Serial/Trace                  serial3
N3K-C3548P#
N3K-C3548P# show virtual-service utilization name guestshell+
Virtual-Service Utilization:

CPU Utilization:
  Requested Application Utilization:  1 %
  Actual Application Utilization:  0 % (30 second average)
  CPU State: R : Running

Memory Utilization:
  Memory Allocation: 262144 KB
  Memory Used:       13444 KB

Storage Utilization:
  Name: _rootfs, Alias:
    Capacity(1K blocks):  243823      Used(1K blocks): 156896
    Available(1K blocks): 82331       Usage: 66 %

  Name: /cisco/core, Alias:
    Capacity(1K blocks):  2097152     Used(1K blocks): 0
    Available(1K blocks): 2097152     Usage: 0  %
N3K-C3548P#
By default, the resources allocated to the Guest Shell are small compared to the total resources available in a switch. An administrator can change the size of the CPU, memory, and root filesystem (rootfs) resources allocated to the Guest Shell by using guestshell resize commands in the configuration mode. Note that after changing resource allocations, a Guest Shell reboot is required. This can be achieved by using the guestshell reboot command, which basically deactivates and reactivates the Guest Shell.
Accessing Guest Shell
By default, the Guest Shell starts with an open-ssh service as soon as it is enabled. The server listens to TCP port 17700 on the local host loopback IP interface 127.0.0.1. This provides password-less access to the Guest Shell from the NX-OS, as shown in Example 7-3.
Example 7-3 Access Guest Shell
N3K-C3548P#
N3K-C3548P# guestshell
[admin@guestshell ~]$
[admin@guestshell ~]$ whoami
admin
[admin@guestshell ~]$ hostnamectl
   Static hostname: guestshell
         Icon name: computer-container
           Chassis: container
        Machine ID: 2a79cdc74cdc45659ad7788742da0599
           Boot ID: 295a7ceda3684f3caa2d5597de8ae1e0
    Virtualization: lxc-libvirt
  Operating System: CentOS Linux 7 (Core)
       CPE OS Name: cpe:/o:centos:centos:7
            Kernel: Linux 4.1.21-WR8.0.0.25-standard
      Architecture: x86-64
[admin@guestshell ~]$
[admin@guestshell ~]$
[admin@guestshell ~]$ ps -ef | grep 17700

UID        PID  PPID  C STIME TTY      TIME     CMD
root        91     1  0 Aug30 ?        00:00:00 /usr/sbin/sshd -D -f /etc/ssh/
  sshd_config-cisco -p 17700 -o ListenAddress=localhost
admin     1515  1495  0 18:40 pts/4    00:00:00 grep --color=auto 17700
[admin@guestshell ~]$
Notice that the file used to spawn the default SSH process is /etc/ssh/sshd_config-cisco. If this file is altered, the guestshell command might not function properly. If that occurs, it is recommended that you destroy and re-enable the Guest Shell.
Accessing Guest Shell via SSH
To access the Guest Shell, you need to be in the switch first and then access the shell using the guestshell command mentioned earlier in this chapter in “Accessing Guest Shell.” This access can be slow, and it is highly preferable to have a direct SSH access.
As you see in Example 7-4, after logging into the Guest Shell, check the SSH configuration—the TCP port it is listening to and the IPv4/v6 addresses associated to the SSH service. Because NX-OS has allocated TCP port number 22 to the SSH process running in the switch, configure an unused and different TCP port number for the Guest Shell’s SSH daemon. As you see in Example 7-4, /etc/ssh/sshd_config has Port 2222 assigned to the service, and it is listening for connections at 10.102.242.131, which is the IP address assigned to the Ethernet1/1 interface of the switch. Make sure to configure the DNS server for name resolution and domain information for the Guest Shell and the applications installed in it to resolve domain names.
Example 7-4 Guest Shell Networking
[admin@guestshell ~]$ more /etc/ssh/sshd_config
<snip>
Port 2222
#AddressFamily any
ListenAddress 10.102.242.131
#ListenAddress ::
<snip>
[admin@guestshell ~]$
[admin@guestshell ~]$ cat /etc/resolv.conf
nameserver 8.8.8.8
search example.com
[admin@guestshell ~]$
In any CentOS-based Linux platform, Guest Shell uses systemd as its service manager. Therefore, systemctl commands can be used to start, stop, restart, reload, or check the status of the SSH service, as shown in Example 7-5. Check the status of the SSH service before starting it.
Example 7-5 Activate SSH Service
[admin@guestshell etc]$ systemctl start sshd
[admin@guestshell ~]$
[admin@guestshell ~]$ systemctl status sshd.service
sshd.service - OpenSSH server daemon
Loaded: loaded (/usr/lib/systemd/system/sshd.service; disabled; vendor preset:
  enabled)
Active: inactive (dead)
<snip>
[admin@guestshell ~]$
[admin@guestshell ~]$ systemctl start sshd.service -l
[admin@guestshell ~]$
[admin@guestshell ~]$ systemctl status sshd.service -l
sshd.service - OpenSSH server daemon
Loaded: loaded (/usr/lib/systemd/system/sshd.service; disabled; vendor preset:
  enabled)
Active: active (running) since Sat 2019-08-31 15:33:52 UTC; 4s ago
Main PID: 886 (sshd)
 CGroup: /system.slice/sshd.service
         └─886 /usr/sbin/sshd -D
Aug 31 15:33:52 guestshell sshd[886]: Executing: /usr/sbin/sshd -D
Aug 31 15:33:52 guestshell sshd[886]: Server listening on 10.102.242.131 port 2222.
[admin@guestshell ~]$
As shown in Example 7-6, make sure the TCP socket assigned to Guest Shell’s SSH service is open and in the listening state. Because Guest Shell uses kstack networking implementation, a Kernel Socket is allocated for TCP port 2222, as shown in Example 7-6.
Example 7-6 Open Kernel Sockets in Nexus Switch
N3K-C3548P#
N3K-C3548P# show sockets connection
Total number of netstack tcp sockets: 3
Active connections (including servers)
        Protocol State/       Recv-Q/   Local Address(port)/
                 Context      Send-Q    Remote Address(port)
[host]: tcp(4/6) LISTEN       0         *(22)
                 Wildcard     0         *(*)

[host]: tcp      LISTEN       0         *(161)
                 Wildcard     0         *(*)

[host]: tcp(4/6) LISTEN       0         *(161)
                 Wildcard     0         *(*)

<snip>
Kernel Socket Connection:
Netid    State     Recv-Q  Send-Q    Local Address:Port    Peer Address:Port
tcp      LISTEN    0       128       10.102.242.131:2222   *:*
<snip>
Once the SSH service is up and running and all the configured sockets are in the listening state, users can access Guest Shell via SSH from an external device, as shown in Example 7-7.
Example 7-7 SSH Access to Guest Shell
root@Ubuntu-Server1$ ssh -p 2222 admin@10.102.242.131
admin@10.102.242.131's password:
Last login: Sat Aug 31 11:42:26 2019
[admin@guestshell ~]$
It is possible to run multiple instances of SSH Server daemons and associate them to any VRF active in the switch. In other words, the Guest Shell can be accessed via SSH through two sockets associated to different namespaces or VRFs, hence from different networks. Example 7-8 shows that the switch has two sockets open: one for management VRF and the other one for default VRF. The socket allocated for the SSH service in the default VRF is (172.16.1.1:5123) and is (10.102.242.131:2222) for the management VRF.
Example 7-8 SSH Service per Namespace
[admin@guestshell ~]$ chvrf default
[admin@guestshell ~]$
[admin@guestshell ~]$ /usr/sbin/sshd -p 5123 -o ListenAddress=172.16.1.1
[admin@guestshell ~]$
[admin@guestshell ~]$ exit
N3K-C3548P#
N3K-C3548P# show sockets connection | include Netid|2222|5123
Netid  State      Recv-Q Send-Q Local Address:Port       Peer Address:Port
tcp    LISTEN     0      128    172.16.1.1:5123          *:*
tcp    LISTEN     0      128    10.102.242.131:2222      *:*
N3K-C3548P#
Guest Shell Networking Setup and Verification
Guest Shell is a powerful container and application hosting environment because it provides access to every front-panel port, VLAN SVIs, and port-channels in the device. Using the Cisco kstack implementation, all these interfaces are represented and available as network devices in the Linux kernel.
With the command shown in Example 7-9, check the VRFs that are visible to the Guest Shell container, where each VRF is a Kernel Network Namespace, as represented in the Linux kernel.
Example 7-9 Guest Shell Namespaces
[admin@guestshell ~]$ ip netns list
management
default
[admin@guestshell ~]$
Figure 7-4 illustrates that namespaces created for each of the VRFs and shows the interfaces associated to each of these VRFs.
)
Figure 7-4 Guest Shell Namespaces
Because the physical and logical interfaces are accessible through network namespaces, the container can access network elements directly. As shown in Example 7-10, the chvrf command switches the context to a specific VRF, and ifconfig -a is used to list the interfaces associated to the current context.
The chvrf command is a helper utility that uses the ip netns exec command under the hood to switch the VRF context. Apart from the ifconfig command provided in this example, you can also use the ip link show command to obtain a list of interfaces associated to the specific context.
Example 7-10 Guest Shell Namespaces and Network Devices
[admin@guestshell ~]$ chvrf default
[admin@guestshell ~]$
[admin@guestshell ~]$ ifconfig -a
Eth1-1: flags=4163<UP,BROADCAST,RUNNING,MULTICAST>  mtu 1500
        inet 10.102.242.131 netmask 255.255.255.240 broadcast 10.102.242.143
        ether 00:3a:9c:5a:00:67  txqueuelen 100  (Ethernet)
        RX packets 2045299  bytes 469647600 (447.8 MiB)
        RX errors 0  dropped 1615524  overruns 0  frame 0

        TX packets 556549  bytes 95536394 (91.1 MiB)
        TX errors 0  dropped 892 overruns 0  carrier 0  collisions 0

Eth1-2: flags=4099<UP,BROADCAST,MULTICAST>  mtu 1500
        ether 00:3a:9c:5a:00:67  txqueuelen 100  (Ethernet)
        RX packets 0  bytes 0 (0.0 B)
        RX errors 0  dropped 0  overruns 0  frame 0
        TX packets 0  bytes 0 (0.0 B)
        TX errors 0  dropped 0 overruns 0  carrier 0  collisions 0

Eth1-3: flags=4099<UP,BROADCAST,MULTICAST>  mtu 1500
        ether 00:3a:9c:5a:00:67  txqueuelen 100  (Ethernet)
        RX packets 0  bytes 0 (0.0 B)
<snip>
Eth1-48: flags=4099<UP,BROADCAST,MULTICAST>  mtu 1500
        ether 00:3a:9c:5a:00:67  txqueuelen 100  (Ethernet)
        RX packets 0  bytes 0 (0.0 B)
        RX errors 0  dropped 0  overruns 0  frame 0
        TX packets 0  bytes 0 (0.0 B)
        TX errors 0  dropped 0 overruns 0  carrier 0  collisions 0

Lo100: flags=65<UP,RUNNING>  mtu 1500
        inet 10.1.1.1  netmask 255.255.255.0
        ether 00:3a:9c:5a:00:60  txqueuelen 100  (Ethernet)
        RX packets 0  bytes 0 (0.0 B)
        RX errors 0  dropped 0  overruns 0  frame 0
        TX packets 0  bytes 0 (0.0 B)
        TX errors 0  dropped 0 overruns 0  carrier 0  collisions 0
<snip>
veobc: flags=67<UP,BROADCAST,RUNNING>  mtu 1494
        inet 127.1.2.1  netmask 255.255.255.0  broadcast 127.1.2.255
        ether 00:00:00:00:01:01  txqueuelen 0  (Ethernet)
        RX packets 0  bytes 0 (0.0 B)
        RX errors 0  dropped 0  overruns 0  frame 0
        TX packets 134  bytes 57112 (55.7 KiB)
        TX errors 0  dropped 0 overruns 0  carrier 0  collisions 0
<snip>
[admin@guestshell ~]$
All the software data structures, including ARP tables, routing tables, and prefixes, are synchronized between NX-OS and the Linux kernel by the NetBroker process, as illustrated in Figure 7-5. Because the Guest Shell uses the Linux kstack, the data structures synchronization is automatic.
)
Figure 7-5 NetBroker—Synchronize NX-OS and the Linux Kernel
The commands provided in Example 7-11 show the routing table, interface configuration, and statistics as well as the ARP cache in a specific context.
Example 7-11 Guest Shell Routing and ARP Tables—Default Namespace
[admin@guestshell ~]$
[admin@guestshell ~]$ chvrf default route -vn
Kernel IP routing table

Destination     Gateway         Genmask         Flags Metric Ref  Use Iface
0.0.0.0         10.102.242.129  0.0.0.0         UG    51     0      0 Eth1-1
10.1.1.0        0.0.0.0         255.255.255.0   U     0      0      0 Lo100
10.102.242.128  0.0.0.0         255.255.255.240 U     0      0      0 Eth1-1
10.102.242.129  0.0.0.0         255.255.255.255 UH    51     0      0 Eth1-1
127.1.0.0       0.0.0.0         255.255.0.0     U     0      0      0 veobc
127.1.2.0       0.0.0.0         255.255.255.0   U     0      0      0 veobc
[admin@guestshell ~]$
[admin@guestshell ~]$ ifconfig -a Eth1-1
Eth1-1: flags=4163<UP,BROADCAST,RUNNING,MULTICAST>  mtu 1500
        inet 10.102.242.131 netmask 255.255.255.240 broadcast 10.102.242.143
        ether 00:3a:9c:5a:00:67  txqueuelen 100  (Ethernet)
        RX packets 2044610  bytes 469523762 (447.7 MiB)
        RX errors 0  dropped 1614879  overruns 0  frame 0
        TX packets 556415  bytes 95505736 (91.0 MiB)
        TX errors 0  dropped 892 overruns 0  carrier 0  collisions 0
[admin@guestshell ~]$
[admin@guestshell ~]$ arp 10.102.242.129
Address         HWtype  HWaddress           Flags Mask            Iface
10.102.242.129  ether   00:1e:f7:be:70:c2   CM                    Eth1-1
[admin@guestshell ~]$
Make sure the new route added in the default VRF context is synchronized to the global routing table. As shown in Example 7-12, a /16 route is added in the NX-OS, which has synchronized to the Guest Shell.
Example 7-12 NX-OS and Guest Shell Synchronization
N3K-C3548P#(config)# config t
Enter configuration commands, one per line. End with CNTL/Z.
N3K-C3548P(config)# ip route 192.168.0.0/16 10.102.242.129
N3K-C3548P(config)# end
N3K-C3548P# guestshell
[admin@guestshell ~]$
[admin@guestshell ~]$ chvrf default route -nv
Kernel IP routing table
Destination     Gateway         Genmask         Flags Metric Ref  Use Iface
0.0.0.0         10.102.242.129  0.0.0.0         UG    51     0      0 Eth1-1
10.1.1.0        0.0.0.0         255.255.255.0   U     0      0      0 Lo100
10.102.242.128  0.0.0.0         255.255.255.240 U     0      0      0 Eth1-1
10.102.242.129  0.0.0.0         255.255.255.255 UH    51     0      0 Eth1-1
127.1.0.0       0.0.0.0         255.255.0.0     U     0      0      0 veobc
127.1.2.0       0.0.0.0         255.255.255.0   U     0      0      0 veobc
192.168.0.0     10.102.242.129  255.255.0.0     UG    51     0      0 Eth1-1
[admin@guestshell ~]$
The NetBroker module synchronizes the ARP, routes, and other Layer 3 configuration to every kernel namespace available. Now you will switch to the Management namespace and verify the routes and ARP cache there (see Example 7-13).
Example 7-13 Guest Shell Routing and ARP Tables—Management Namespace
[admin@guestshell ~]$
[admin@guestshell ~]$ chvrf management
[admin@guestshell ~]$
[admin@guestshell ~]$ ifconfig -a
eth1: flags=4099<UP,BROADCAST,RUNNING,MULTICAST>  mtu 1500
        inet 172.16.31.5  netmask 255.255.255.0  broadcast 172.16.31.255
        ether 00:3a:9c:5a:00:60  txqueuelen 1000  (Ethernet)
        RX packets 656019  bytes 48111417 (45.8 MiB)
        RX errors 0  dropped 0  overruns 0  frame 0
        TX packets 118874  bytes 31380645 (29.9 MiB)
        TX errors 0  dropped 0 overruns 0  carrier 0  collisions 0
<snip>
[admin@guestshell ~]$ chvrf management route -vn
Kernel IP routing table

Destination     Gateway         Genmask         Flags Metric Ref  Use Iface
0.0.0.0         172.16.31.1     0.0.0.0         UG    51     0      0 eth1
<snip>
[admin@guestshell ~]$
[admin@guestshell ~]$ arp 172.16.31.1
Address         HWtype  HWaddress           Flags Mask            Iface
172.16.31.1     ether   00:1e:f7:a3:81:c6   CM                    eth1
[admin@guestshell ~]$
Installation and Verification of Applications
As you see in Example 7-14, the Guest Shell in Cisco Nexus 9000 Series devices supports Python version 2.7.5 in both interactive and noninteractive (script) modes.
The Python scripting capability in Nexus 9000 gives programmatic access to the device’s command-line interface (CLI) to perform various tasks like Power On Auto Provisioning (POAP) and Embedded Event Manager (EEM).
Example 7-14 Python in Guest Shell
[admin@guestshell ~]$
[admin@guestshell ~]$ python
Python 2.7.5 (default, Jun 17 2014, 18:11:42)
[GCC 4.8.2 20140120 (Red Hat 4.8.2-16)] on linux2
Type "help", "copyright", "credits" or "license" for more information.
>>> print "Hello"
Hello
>>> quit()
[admin@guestshell ~]$
You will start with developing and running a Python application in the Guest Shell.
Custom Python Application
Python applications can be run from NX-OS using the run guestshell python command, or they can be natively run in the shell itself. As you see in Example 7-15, the Python application hello.py runs natively from NX-OS using the run guestshell python command and from the Guest Shell using the python command.
Example 7-15 Run Python Application in Guest Shell
N3K-C3548P#
N3K-C3548P# show file bootflash:hello.py
#!/usr/bin/env python

import sys

print "Hello, World!"
list = ['one', 'two', 'three']
for item in list:
      print item
N3K-C3548P#
N3K-C3548P# run guestshell python /bootflash/hello.py
Hello, World!
one
two
three
N3K-C3548P#
N3K-C3548P# guestshell
[admin@guestshell ~]$
[admin@guestshell ~]$ python /bootflash/hello.py
Hello, World!
one
two
three
[admin@guestshell ~]$ exit
N3K-C3548P#
Python API–Based Application
Cisco NX-OS has a built-in package providing API access to CLIs at the exec level as well as configuration commands, referred to as Python APIs. As you learned previously, Guest Shell also has access to Python APIs. As you see in Example 7-16, an NX-OS CLI show clock is accessed using the Python API available in the Guest Shell.
Example 7-16 Python API–Based Application
N3K-C3548P#
N3K-C3548P# guestshell
[admin@guestshell ~]$
[admin@guestshell ~]$ python
Python 2.7.5 (default, Jun 17 2014, 18:11:42)
[GCC 4.8.2 20140120 (Red Hat 4.8.2-16)] on linux2
Type "help", "copyright", "credits" or "license" for more information.
>>>
>>> from cli import *
>>> cli('show clock')
'02:24:50.130 UTC Sun Sep 01 2019\nTime source is NTP\n'
>>> exit()
[admin@guestshell ~]$
Example 7-17 shows a sample custom Python application that leverages Python APIs. In this example, cli returns the raw format of the CLI output, including control and special characters. clid returns a dictionary of attribute names and values for the given CLI commands, which makes it easier to process the data programmatically and automate.
Example 7-17 Python API–Based Application: JSON
[admin@guestshell ~]$ more PY-API2.py

#!/usr/bin/python
from cli import *
import json

print("STANDARD CLI OUTPUT ...")
print (cli('show interface eth1/1 brief'))

print("JSON FORMAT CLI OUTPUT ...")
print (clid('show interface eth1/1 brief'))

[admin@guestshell ~]$
[admin@guestshell ~]$
[admin@guestshell ~]$ python PY-API2.py
STANDARD CLI OUTPUT ...
-----------------------------------------------------------------------------
Ethernet   VLAN    Type Mode   Status  Reason     Speed     Port
Interface                                                   Ch #
-----------------------------------------------------------------------------
Eth1/1     --      eth  routed up      none       1000(D)   --

JSON FORMAT CLI OUTPUT ...
{"TABLE_interface": {"ROW_interface": {"interface": "Ethernet1/1", "vlan": "--",
  "type": "eth", "portmode": "routed", "state": "up", "state_rsn_desc": "none",
  "speed": "1000", "ratemode": "D"}}}
[admin@guestshell ~]$
To learn more about Python APIs and the Software Development Kit (SDK) supported in Nexus 9000 platforms, refer to the Cisco Nexus 9000 Series SDK User Guide provided in the “References” section.
The dohost command shown in Example 7-18 is a Python wrapper script using NX-API functions. Make sure to have the NX-API feature enabled to leverage this capability. Using dohost capability, application developers can perform show commands as well as configuration commands.
Example 7-18 Run NX-OS CLIs in Guest Shell with dohost
[admin@guestshell ~]$
[admin@guestshell ~]$ dohost "show clock"
02:23:41.492 UTC Sun Sep 01 2019
Time source is NTP
As you learned in the previous section, the Guest Shell with CentOS 7 also can install software packages using Yum utility. The Guest Shell is prepopulated with many of the common tools that would naturally be expected on a networking device, including net-tools, iproute, tcpdump, OpenSSH, and the PIP for installing additional Python packages. As you have just learned, Python 2.7.5 is included by default.
Leveraging high-end capabilities and features in Guest Shell, it is easy to integrate it into your day-to-day automation workflow. With the support of device-level API integration and support for scripting with languages like Python, Ruby, and so on, it is easier now to do on-box prototyping of applications or scripts. Guest Shell has its user space and resources isolated from the host and other containers and any faults/failures seen in those container spaces. All the capabilities make Guest Shell a powerful environment to develop and host applications.