Configuration Management Tools
A configuration management tool may require an agent, which is a piece of software that must be installed on the system or device you want to manage. In a network automation use case, this requirement could be problematic because some network devices cannot support running agents and loading general software. In a situation where the network devices do not support an agent, you can use a tool that supports proxy agents or a tool that does not require agents at all.
There are two core types of configuration management tools, and there is also a third type that is usually a derivation of an agent-based tool:
▪ Agent-based configuration: With agent-based tools, an agent must be installed on every device that the configuration management tool will manage.
▪ Agentless configuration: Agentless tools do not require that an agent be installed on every device; instead, they communicate via SSH or another API that a device supports.
▪ Proxy-agent configuration: This type of configuration does not require an agent on every device, but it does require some type of “process” or “worker” to communicate with the master server and the remote device.
Configuration management tools define target end states and allow maximum flexibility to automate 1 device or 10,000 devices. For example, you might want to ensure that your networking devices have the latest version of their software. When you describe what you want to automate in a configuration management tool, you often use a domain-specific language (DSL) or a structure markup language such as YAML. A DSL is a language that is designed specifically to express solutions to problems in a particular domain; in other words, DSLs are special-purpose computer languages and limited compared to a language such as Python or Ruby, which are general-purpose languages.
Some of the benefits of using configuration management tools are fast implementation, lower failure rates, shortened times between fixes, and, importantly, faster user adoption for nonprogrammers. Using these tools also brings the networking environment close to the concept of continuous delivery. It enables infrastructure as code (IaC), which is the idea of writing software for the infrastructure so you can deploy the entire environment by leveraging code rather than manually defining all parameters, which makes it a programmable infrastructure.
From a networking perspective, it is common to deploy changes manually. As an example of changes, you might add a VLAN across a data center or campus, or you might make daily changes to firewall policies for new applications that are deployed. When there is a defined manual workflow to perform a set of tasks, proper tools should be used to automate it. It does not make sense to spend an hour performing a change when it could take just a few minutes to make the change by using a properly engineered tool. Tools such as Puppet, Chef, Ansible, and SaltStack can dramatically reduce the number of manual interactions in a network.
Configuration management tools are often referred to as DevOps tools. Organizations that have implemented some form of DevOps practices use these configuration management and automation tools to automate application, infrastructure, and network deployments to a high degree without the need to do manual programming using a language such as Python. These tools reduce the time it takes to perform certain tasks and offer greater predictability.
Configuration Management for Networking
Puppet, which was created in 2005, has been in use longer than Chef and Ansible. Puppet manages systems in a declarative manner, which means you define an ideal state of the target system without worrying about how it happens. (In reality, this is the approach that all these tools take.) Puppet is written in Ruby and refers to its automation instruction set as Puppet manifests. The major point to realize is that Puppet is agent based.
As mentioned earlier, agent based means that a software agent must be installed on all devices that you want to manage with Puppet, including servers, routers, switches, and firewalls. It is often impossible to load an agent on every network device, so the number of devices that can be used with a new Puppet package is limited. This can be remedied thanks to the use of Puppet proxy devices. Regardless, this means that Puppet has a greater barrier to entry when getting started.
Chef, another popular configuration management tool, follows much the same model as Puppet. Chef is based in Ruby, uses a declarative model, is agent based, and refers to the Chef automation instruction as recipes (groups of which are called cookbooks).
It is often difficult to load agents onto all machines to automate them. However, even when it is technically possible to do so, deploying the solution or tool can be time-consuming. Ansible was created as an agentless alternative to Puppet and Chef. Red Hat acquired Ansible in 2015, and IBM more recently acquired Red Hat. Being natively agentless significantly lowers the barrier to entry from an automation perspective. Because Ansible is agentless, it can integrate and automate a device by using an API. For example, integrations can use REST APIs, Network Configuration Protocol (NETCONF), SSH, or even Simple Network Management Protocol (SNMP), if desired. A playbook is a set of Ansible tasks (instructions) that is used to automate devices. Each playbook consists of one or more plays, each of which consists of individual tasks. Ansible is written in Python.
It is worth noting that each of these tools had its start in automation for applications and cloud infrastructure. It was not until each of them had a significant amount of traction in the market that they started to include network automation in their portfolios.
Salt, by SaltStack, is an agent-based configuration management and orchestration tool that is similar to Puppet and Chef. Each Salt-managed node must have a Salt minion service installed. Usually, this approach is not an issue on a server, but in the networking world, it is not always possible to install custom software on the network equipment that you want to manage. To solve this problem with Salt, you can use a proxy minion, which is basically a minion that does not need to be installed on the targeted device and can run ubiquitously. In other words, proxy minions run intermediate software that mediates between the Salt master and the Salt minion. The Salt master is a master daemon that is used for sending configurations and commands to the Salt minions. The Salt master is basically a machine that manages the infrastructure and dictates policies. Salt minions receive the configuration and commands from the master daemon. It is the responsibility of Salt minions to execute the instructions sent by the Salt master, report job success, and provide data related to the underlying host.
Salt is written in Python, and it uses a message queue–based system called ZeroMQ to push commands and configuration to minions. It also allows for publish and subscribe messaging.
Figure 3-1 compares these three configuration management tools. Notice the relationships of the different deployment models: agent based, agentless, and hybrid.
)
Next we look at each of these tools in more detail.
System Management with Ansible
Ansible is open-source provisioning software that allows for centralized configuration management. Ansible was originally written by Michael DeHann of AnsibleWorks, which was acquired by Red Hat in 2015. Red Hat in turn was acquired by IBM in 2019. Ansible is free and open source and is included as part of Fedora. It is also available for RHEL, CentOS, Scientific Linux, and other operating systems through their respective package management systems or the Python package management tool pip.
Unlike other management platforms and services, Ansible does not require an agent to be installed on the system that it manages, nor does Ansible need or use a centralized controller for configuration management. It is possible to perform automation from any management system by referencing inventories, modules, or playbooks.
Its declarative approach means that you only tell Ansible what you want to achieve as a final goal instead of encoding all instructions to reach it. For example, you do not have to tell Ansible where a specific service resides, how to start it, and what to do after it starts. You simply say, “I want this service to be started, and then I want another service to be restarted.”
System Management with Ansible: Components
The components of Ansible come together to make a very powerful management system. Understanding each component and the relationships between the components is essential to realizing their power:
▪ Ansible control station is the management station and launching point for all Ansible activities. Unlike many other management platforms, Ansible does not require a dedicated server or elaborate hardware to manage an environment. You could literally manage an enterprise from your personal laptop.
▪ An Ansible module is a standalone collection of commands that is written in a standard scripting language (for example, Python) and used to execute a state change. An administrator can write an Ansible module using any language that supports the JavaScript Object Notation (JSON) data format.
▪ Playbooks are files that are used to define the desired or final state and also used to orchestrate operation across multiple nodes.
▪ Inventory files contain systems managed by Ansible. An administrator uses an inventory file to group managed systems. Inventory files can be dynamically built by contacting a remote API that responds with a valid JSON response.
▪ YAML files are commonly referred to as configuration files and destinations for data being stored. Ultimately, YAML is a data format that is transported over Secure Shell (SSH) by default and with PowerShell support for Windows nodes over the WS-Management protocol.
▪ Ansible Tower is a web service console (GUI) that follows the REST standard for programmability. It is a licensed product from Red Hat, based on the open-source AWX Project.
System Management with Ansible: Tools
Managing Ansible is a simple process that basically involves selecting a terminal program to connect to your management server running Ansible. You can select your preferred text editor for creating and editing inventory files, playbooks, and modules, and you can use your preferred version control service to manage access to code and control collaboration and editing. Examples of these tools include PuTTY for SSH access, Visual Studio Code for configuration file management, and GitLab for storage, collaboration, and version control. All this can be done from any Linux-based machine that has Python and Ansible installed.
How Ansible Works
Working with Ansible requires only a few quick installation and update steps. Once the installation and update are complete, you can configure Ansible operations and defaults. The inventory file and modules work together to help you execute your changes to the specified target systems.
You can install Ansible in multiple ways, the easiest of which is to use Python pip. With a Python virtual environment active, execute pip install ansible, and you are done. You can then execute ansible -version to verify that the installation was successful. Many operating systems offer Ansible prepackaged in their repositories (for example, yum install ansible, apt-get install ansible). Ansible configuration files are used to configure Ansible operations. The base configuration file is located at /etc/ansible/ansible.cfg.
Inventory files enable an administrator to define an inventory of systems against which Ansible modules will be executed. The basic contents of an inventory file are hosts and groups. Host entries point to the Domain Name System (DNS) name or IP address of a managed end system, and a group is a collection of hosts under a collective label.
How Ansible Works: Push Model
With Ansible installed and upgraded and a list of devices in your network defined in an inventory file, you can manage configuration modules and execute them to make changes to your managed devices.
An Ansible module can be thought of as a small program pushed to and run on a managed device to achieve the desired configuration state for that device. Most modules are standalone. Ansible also gives an administrator the ability to write modules by using standard scripting languages such as Python. With more than 750 built-in modules, organized by vendor and technology, Ansible enables administrators to ramp up and manage their environments quickly and easily.
You can use the ansible-doc modulename command to quickly view information about how to use an installed module. For more information, see https://docs.ansible.com.
When you have modules installed, you can execute them from the Ansible host against the systems defined with your inventory file by using the ansible-playbook example-playbook.yml command. Ansible connects to all systems defined in the inventory simultaneously, makes the prescribed changes, and displays the status PLAY RECAP on the terminal screen.
Ansible also supports ad hoc execution of modules. To use this feature, run the command ansible host1,group2 -m modulename -a moduleargs, where host1 and group2 are entries defined in your inventory file, modulename is the name of the Ansible module you want to execute, and moduleargs are the required arguments for the specific module.
Some modules don’t require arguments and can be called only with modulename; for example, ansible host1,host2,host3 -m ping returns success if all hosts are reachable. In this example, ping is the name of the module being called.
Ansible Playbooks: Terms
Ansible uses some specific terminology for orchestration through playbooks, as shown in Table 3-1.
Table 3-1 Ansible Terms
Term |
Description |
|---|---|
Module |
Code, written using any of a number of scripting languages (for example, Python), to perform an action on a managed device. |
Task |
An action referencing a module to run together with input argument and actions. |
Play |
A set of tasks for a host or group of hosts. |
Playbook |
A file, written in YAML, that includes one or more plays. |
Role |
A set of playbooks, often prebuilt, used to execute a standard configuration in a repeatable manner. You can assign multiple roles to a single host. |
For example, an inventory file might contain server1, server2, and server3 host entries that are part of the internet_servers group, which should have ssh_server, http_server, and php_server roles applied.
Ansible Playbooks: Components
An Ansible playbook is a simple human-readable text file in YAML format, with keywords that Ansible recognizes as instructions. Because YAML is a plaintext file, it is ideal for collaboration and makes troubleshooting much easier because line numbering and version control provide insight into what was changed and when and who made the changes.
A playbook can be named and consists of hosts and tasks that should be performed. A lot of optional keywords can be used to change the way Ansible interacts with hosts defined in an inventory file. For example, gather_facts is an instruction to Ansible that enables or disables runtime variables available to tasks. Setting it to no makes execution faster, but the tasks lose access to variables that Ansible collects before execution; for example, ansible_distribution would be empty instead of containing the value Ubuntu or RedHat.
Figure 3-2 shows an example of an Ansible playbook.
)
A pound sign (#) indicates a comment; Ansible ignores everything from the # to the end of the line.
The vars section contains user-defined variables that are later referenced in the tasks section. Variable expansion is done by enclosing a variable name inside double curly brackets—for example, {{ variable }}.
The tasks section contains tasks that are executed in the order in which they are listed, and they are executed in linear fashion on each host; that is, when one task finishes on all hosts, execution of the next task starts. This behavior can be changed by setting strategy to free in the top-level section of the playbook.
Ansible can run in parallel on a maximum of five hosts. If you add more hosts, you must wait longer for each task to complete. You can change this behavior by setting forks to 20 in the top-level section of the playbook.
Each section under tasks starts with an optional name, followed by a module name that you want to use (apt and service in Figure 3-2). Module parameters belong under the module name and must be indented to indicate that they belong to the module and not the task. Some module parameters are required; others are optional. You can find out which parameters are required by using an equals (=) sign in the output of ansible-doc apt.
The playbook in the example in Figure 3-2 declares the variable packages and connects to server1 and server2. The first task updates the apt cache with the latest package information from remote repositories and installs the tcpdump and apache2 packages. The second task starts the apache2 web server and enables the apache2 web server to start on boot.
Ansible Playbooks: Inventory File
An inventory file is a collection of all the hosts that are managed by Ansible. It is a simple plaintext file in which you specify hosts, logical groupings, and special variables for Ansible.
Figure 3-3 shows an example of an inventory file that contains the following information:
▪ A group named servers with two hosts, each with a special variable ansible_port to indicate that sshd is running on a nonstandard port
▪ A group named switches with two hosts
▪ A group named routers with two hosts
▪ A group named datacenter with groups servers, switches, and routers as members
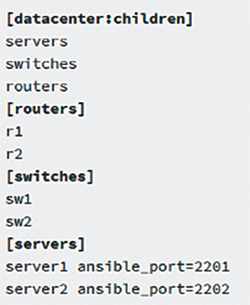
Figure 3-3 Ansible Inventory Example
You can target any of the hosts or groups in your inventory by changing the hosts keyword in your playbook. The group datacenter is convenient when you want to execute something on all the desired groups or set a variable for all groups in one place. There is also a predefined default group named all, which you can use to target all hosts in your inventory.
Ansible: Executing the Playbooks
You can execute a playbook by using the ansible-playbook -u username root example.yml command, where -u username is your username for administrative login and example.yml is the name of your playbook. Ansible uses the root username by default, so you can omit -u in this command if you want to use root.
Figure 3-4 shows an example of an Ansible Playbook running.
)
In the example shown in Figure 3-4, Gathering Facts runs before any tasks to collect system information and populate variables that the tasks might need. You can disable this behavior by setting gather_facts to false. The Install packages task runs first, Start and enable web server runs second, and PLAY RECAP tells you how many tasks made changes on each host (two in this case).
System Management with Puppet
Puppet is a configuration management tool that you can use to automate configuration deployment in your infrastructure. The Puppet configuration management tool has the following features:
▪ Puppet is an open-source project managed by a company called Puppet.
▪ It is written in C++, Clojure, and Ruby.
▪ It uses Puppet’s declarative language to describe a desired configuration.
▪ It can be used on many different systems, including various Linus distributions (such as Red Hat and Ubuntu), various UNIX systems, and Windows.
Puppet Architecture
Puppet has a client/server architecture. The client in Puppet is called the agent, and the server is called the master. The master controls the complete configuration, and the agent periodically pulls the configuration from master. The following workflow is used to update the agent’s configuration:
An agent node requests a catalog from the master.
The master compiles the Puppet code and returns the catalog with the required configuration.
The agent applies the configuration by checking the state of the resources and applying the required changes.
The agent responds with the report.
This procedure is repeated periodically. By default, an agent requests the configuration every 30 minutes. Typically, you would want to manage the complete infrastructure with one tool. Puppet requires that an agent be installed on each managed node. However, you cannot install an agent on some devices, such as switches, routers, and firewalls. For those devices, you need to configure a node as a proxy for devices. The proxy performs all communication with the master, connects to the device, and applies the configuration.
Basic Puppet Concepts
When you use Puppet, it is important to be familiar with its basic concepts:
▪ Resource: This is the portion of Puppet code that describes a particular aspect of a system.
▪ Class: This is a collection of resources that can be reused multiple times.
▪ Manifest: This configuration file describes how to configure your resources.
▪ Catalog: This is a compiled configuration for each individual node.
▪ Module: This is a collection of manifests, templates, and other files that is used to configure multiple options of a specific feature and can be reused.
The most elementary Puppet entity is called a resource. It is a unit of configuration that you use in configuration files. You need to define a resource type, a title, and one or more attributes with specific values. A resource is defined with the following syntax:
<TYPE> { '<TITLE>': <ATTRIBUTE> => <VALUE>, }
You can list multiple attributes, separated with commas. You can also write attributes on multiple lines. Resources must be unique to avoid having conflicting values for the same resource. The uniqueness is achieved with the resource title and the name attribute. If resources are not unique, you get an error when compiling the configuration.
You can group resources into classes. Classes are similar to classes in regular programming languages, as you can use them to better organize the code. Before you can use a class, you need to define a class. Defining a class means specifying the class’s configuration and making it available for later use. The class definition does not specify any actual configuration for nodes.
The main configuration of the infrastructure is specified in a manifest. The manifest stores the Puppet code that describes how resources should be configured. The manifest is a text file with the .pp extension. It uses UTF-8 encoding. The manifest can be a single file, or you can specify configuration in a directory that contains multiple manifests. Puppet treats multiple files as one. The main manifest is usually called site.pp.
The configuration in manifests is compiled into a catalog for each individual node. The catalog describes the desired state of a specific node and is generated from the logic that is defined in the manifest. The master node sends the catalog to the agent. The agent applies the required configuration to the resource to bring the node to the desired state.
When you start writing complex manifests, you probably want to store your code in modules. Modules allow reusability. They are used to configure a specific part of the infrastructure. Modules contain all previously described elements, including resources, classes, and manifests. You can write your own modules, but you must follow a defined structure and place the module in the correct location on the system. There are also a lot of modules available from Puppet Forge, written by Puppet developers and members of the open-source community. When you develop or install a module, the module gives you classes and resources that you can use in your configuration code. You can use these classes in the same way you would define classes inline in the main manifest.
Puppet Example
Example 3-1 shows a Puppet configuration with the following objectives applied to two Linux servers called puppeta01 and puppeta02:
▪ Configure the IP address on the network interface.
▪ Configure the default gateway.
▪ Configure the DNS server.
▪ Configure the NTP address.
This code would be added to a file called site.pp.
Example 3-1 Puppet Configuration Script
The first class in Example 3-1, conf_if, accepts the ip_address variable. The first action is to create a file in the correct location, which is specified with the path attribute. The content attribute specifies the content of the file. The content is created with the template function, which evaluates the specified template with the defined variables. In this case, you need to pass the ip_address variable. The content attribute uses the $settings::manifest variable to point to the correct location on the file system. Next, you need to disable and enable the interface to apply the new configuration. The exec resource uses the require attribute, which adds a dependency. The code first creates a file, then executes the ifdown command, and finally executes the ifup command.
The second class in the example, conf_dns, creates a template that will be used in the /etc/resolv.conf file and applies the 192.168.1.253 and 192.168.1.254 IP addresses to the DNS configuration of the device.
The final two sections define the nodes that will receive the required configuration. Both nodes call the conf_if class for IP address assignment, call the conf_dns class, and call an external NTP module called ntp that was previously installed.
Now that the configuration is ready, the last step is to execute the puppet agent -t command on the node to run the pull request and update the configuration; alternatively, you can just wait until the next pull period.
System Management with Chef
Chef is a powerful automation platform that transforms complex infrastructure into code, enabling data center infrastructure automation with a declarative, intent-based model. Whether you’re operating in the cloud, on premises, or in a hybrid environment, Chef automates how applications are configured, deployed, and managed across your network, no matter its size.
Chef is built around simple concepts: achieving desired state, using centralized modeling of IT infrastructure, and using resource primitives as building blocks. These concepts enable you to quickly manage any infrastructure with Chef. These very same concepts allow Chef to handle the most difficult infrastructure challenges and customer use cases; anything that can run the Chef client can be managed by Chef.
Chef, like Ansible and Puppet, exists as software packages that you install and run. Chef (the company) offers several products; Chef Automate is the product that most people refer to simply as Chef. As with Puppet, in production, you are likely to run Chef as a server (in what is called server-client mode), and engineering staff use multiple Chef workstations to build Chef files that are stored on the Chef server. However, you can also run Chef in standalone mode (called Chef Zero), which is helpful when you’re just getting started and learning in the lab.
Chef uses an architecture similar to that of Puppet. For network devices, each managed device (called a Chef node or Chef client) runs an agent. The agent performs configuration monitoring in that the client pulls recipes and resources from the Chef server and then adjusts its configuration to stay in sync with the details in those recipes and run lists. Note, however, that Chef requires on-device Chef client code, and many Cisco devices do not support a Chef client, so you are likely to see more use of Ansible and Puppet for Cisco device configuration management.
Chef Concepts
When you use Chef, it is important to be familiar with its basic concepts:
▪ Chef server: The Chef server acts as a hub for configuration data. It stores the following:
▪ Cookbooks
▪ Recipes (the policies that are applied to nodes)
▪ Metadata that describes each registered node that is being managed by the Chef client
▪ Node: A node is any physical, virtual, or cloud machine or switch configured to be maintained by a Chef client.
▪ Chef client: The Chef client runs locally on every node that is registered with the Chef server. It performs all configuration tasks specified by the run list and brings the client into the desired state.
▪ Chef resources: This is a grouping of managed objects/attributes and one or more corresponding implementations. It describes the desired state for a configuration item and declares the steps needed to bring that item to the desired state. It specifies a resource type, such as a package, template, or service, and lists additional details (also known as attributes) as necessary. Resources are grouped into recipes, which describe working configurations.
▪ Cookbook: A cookbook defines a scenario and contains everything that is required to support that scenario. A cookbook is used for device configuration and policy distribution and includes the following elements:
▪ Recipes that specify the resources to use and the order in which they are to be applied
▪ Attribute values
▪ File distributions
▪ Templates
▪ Extensions to Chef, such as libraries, definitions, and custom resources
▪ Recipe: A recipe is a collection of resources, defined using patterns (resource names, attribute/value pairs, and actions). Helper code is added to a recipe by using Ruby. Recipes must follow the following guidelines:
▪ A recipe must be stored in a cookbook.
▪ A recipe may use the results of a search query and read the contents of a data bag.
▪ A recipe may have a dependency on one (or more) recipes.
▪ A recipe must be added to a run list before it can be used by the Chef client.
▪ A recipe is always executed in the same order as listed in a run list.
▪ The Chef client runs a recipe only when asked to do so.
Chef Example
Example 3-2 shows a sample cookbook configuration of a switch’s Layer 3 and Layer 2 interfaces. The Ethernet 1/1 interface is configured as a Layer 3 interface with an IP address and a subnet mask. Notice that Layer 3 functionality is enabled thanks to the switchport_mode 'disabled' command. Interface Ethernet 1/2 is assigned to VLAN 100 and is configured as an access port.
Example 3-2 Chef Configuration Script
System Management with SaltStack
Created by Thomas Hatch in 2011, Salt, now known as SaltStack, is a modular, Python-based configuration management tool that is designed for high-speed data collection/execution. The tool has gained considerable traction in the enterprise because of its performance benefits over competing solutions, including Ansible.
SaltStack’s speed and performance benefits are made possible by its lightweight ZeroMQ messaging library, which is a framework for establishing concurrent, persistent TCP connections between the server and agents (that is, the Salt master and minions). The platform is available as an open-source project or as an enterprise commercial offering known as SaltStack Enterprise.
Salt Architecture
At the core of the Salt ecosystem are two critical components: the master and the minion. The other components play supporting roles to make the ecosystem work. Figure 3-5 provides a high-level view of a Salt architecture example, which includes the following components:
▪ Master: The master is the server that runs the core services to communicate with the minions. It also contains the key store for encryption between the minions.
▪ Minion: A minion is a Python-based endpoint that can be deployed on all major Linux and Windows operating systems. The minions are connected to the master, and you can have the master ask them to do a variety of tasks by adding an easy-to-understand YAML file or by directly running commands from the master.
▪ SSH (agentless): Salt supports an agentless mode over SSH for assets that don’t have minions installed. Salt SSH supports the same system normalization functions that are supported by the minions.
)
▪ Proxy minion: On assets where agents cannot be deployed or where it is not possible to use SSH for remote access, a Salt proxy minion can be used. The proxy minion is designed to connect to network devices and IoT devices.
▪ Monitor (beacons): Minions can be configured to monitor files, processes, services, and a host of other things. They can also generate events when certain criteria are met, such as failed logins, unauthorized changes to critical files or processes, or even unexpected changes in CPU load or disk usage.
▪ Respond (reactor): Another feature of Salt is its ability to react to events and take actions. The reactor can be configured to take predefined actions based on certain event criteria (such as restarting the MySQL service if it stops). This helps organizations achieve a state of event-driven SecOps IT automation.
▪ States or formulas: These are files that contain YAML and templated data to configure minions.
▪ Grains: Salt comes with an interface to derive information about the underlying system. This is called the grains interface because it presents Salt with grains of information. Grains are collected for the operating system, domain name, IP address, kernel, OS type, memory, and many other system properties. The grains interface is made available to Salt modules and components so that the right Salt minion commands are automatically available on the right systems.
▪ Pillars: A pillar is an interface for Salt that is designed to offer global values that can be distributed to minions. A pillar is a free-form resource of data (that can be JSON, YAML, or whatever you need), and it can either be stored in a file or externally. A pillar allows integration with other systems where a shared data store would be of value (for example, an ITSM or asset register).
▪ Mine: This is used for data fetching so that you can also return data from minions and store it to be used in other tasks, such as for template-based state configuration.
SaltStack Example
Example 3-3 shows a sample configuration that sets the NTP server IP addresses on specific devices. The example creates the necessary pillar files, ntp_server.sls and top.sls. ntp_server.sls contains a list of IP addresses that the devices should use to synchronize their clocks. The top.sls file lists the devices that need to be configured with the NTP addresses. The * tells Salt to provide the content from ntp_servers.sls to all minions.
Example 3-3 SaltStack Configuration Script
The first salt command in this example refreshes the local information on the minions, and the second salt command checks to make sure the data has been loaded correctly on the devices. The output confirms that the three devices are now configured to contact the two NTP servers at 172.17.17.1 and 172.17.17.2.