Home > Articles > Advanced Features

Advanced Features

Chapter Description

In this sample chapter from Implementing Cisco HyperFlex Solutions, you will review the HyperFlex HX Data Platform disaster recovery feature and configuration steps needed to enable replication between two HyperFlex clusters.

From the Book

Implementing Cisco HyperFlex Solutions

Implementing Cisco HyperFlex Solutions

$47.99 (Save 20%)

Replication Pair Overview

Once a replication network is configured and tested, pairing a replication cluster is the next step. Creating a replication cluster pair is a prerequisite for setting up VMs for replication. The replication network and at least one datastore must be configured before the replication pair can be created.

By pairing cluster 1 with cluster 2, you are specifying that all VMs on cluster 1 that are explicitly set up for replication can replicate to cluster 2 and that all VMs on cluster 2 that are explicitly set up for replication can replicate to cluster 1.

By pairing datastore A on cluster 1 with datastore B on cluster 2, you are specifying that for any VM on cluster 1 that is set up for replication, if it has files in datastore A, those files will be replicated to datastore B on cluster 2. Similarly, for any VM on cluster 2 that is set up for replication, if it has files in datastore B, those files will be replicated to data-store A on cluster 1.

Pairing is strictly one to one. A cluster can be paired with no more than one other cluster. A datastore on a paired cluster can be paired with no more than one datastore on the other cluster.

Procedure for Creating Replication Pair

To create a replication pair, create a datastore on the local network and create a datastore on the remote network. Then follow these steps:

  • Step 1. From HX Connect, log in to either the local cluster or the remote cluster as a user with administrator privileges.

  • Step 2. Select the Replication page and then select Pair Cluster, which will bring up the Create New Replication Pair window. Figure 6-10 shows where to pair the new cluster for replication in HX Connect.

    FIGURE 6-10

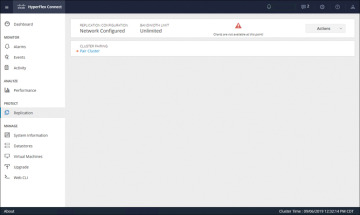
    Figure 6-10 Replication Pair Cluster

  • Step 3. Enter a name for the replication pair on the Name tab, as shown in Figure 6-11, and click Next. The name, which cannot be changed, is set for both the local and remote clusters.

    FIGURE 6-11

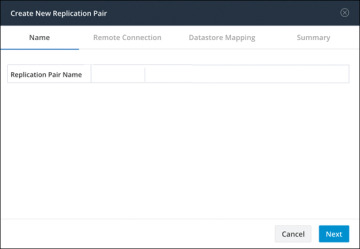
    Figure 6-11 Replication Pair Name

  • Step 4. On the Remote Connection tab (see Figure 6-12), enter the following information:

    • Management IP or FQDN: The IP address or FQDN for the remote HX storage cluster

    • Username: The vCenter single sign-on or cluster-specific administrator username of the remote HX storage cluster

    • Password: The vCenter single sign-on or cluster-specific password of the remote HX storage cluster

    FIGURE 6-12

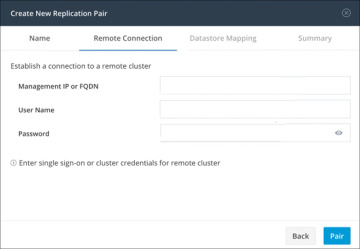
    Figure 6-12 Replication Remote Connection

    When you’re done with these entries, click Pair to pair with the replication remote cluster.

  • Step 5. Go to the Datastore Mapping tab, as shown in Figure 6-13, to view the data-store mapping between the local and remote clusters. The Local Datastore column shows the list of the configured datastores on the local HX storage cluster. The Remote Datastore column pairs the datastores between the HX storage clusters. Click Next.

    FIGURE 6-13

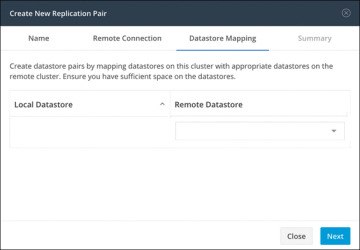
    Figure 6-13 Datastore Mapping Between Clusters

  • Step 6. On the Summary tab, shown in Figure 6-14, review the summary of the data-store mapping. The Datastore field indicates the selected datastore on this local HX storage cluster. The Target Datastore field indicates the datastore on the remote HX storage cluster to which the replication snapshot is copied. Click Map Datastores.

    FIGURE 6-14

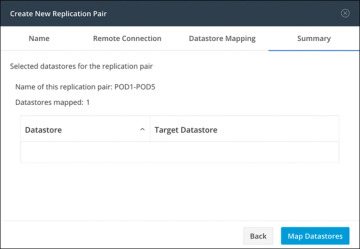
    Figure 6-14 Datastore Mapping Summary

Protecting Virtual Machines

After a replication cluster is formed, the next step is to protect the virtual machines in the clusters. The following attributes are required to protect the virtual machines:

  • Replication interval, which is the frequency of replication

  • A start time (within the next 24 hours), which specifies the first time replication is attempted for that virtual machine

  • Whether the replication snapshot should be taken with the virtual machine quiesced or not

Protection attributes can be created and assigned to protection groups. To assign the protection attributes to virtual machines, you can add them to a protection group. For example, suppose there are three classes of protection: gold, silver, and bronze. You can set up a protection group for each class, with replication intervals such as 5 or 15 minutes for gold, 4 hours for silver, and 24 hours for bronze. Most of your VMs could be protected by merely adding them to one of the three already created protection groups.

To protect virtual machines, you can choose from the following methods:

  • Independently: Select one virtual machine and configure it. Set the replication schedule and the VMware quiesce option for the specific virtual machine. Changes to the replication settings will only affect the independently protected virtual machine. The virtual machine is not included in a protection group.

  • Existing protection group: Select one or more virtual machines and add them to an existing protection group. The schedule and VMware quiesce option settings are applied to all the virtual machines in the protection group. When the protection group settings are changed, the changes are applied to all the virtual machines in the protection group.

  • New protection group: Select two or more virtual machines and choose to create a new protection group. Define the protection group name, schedule, and VMware quiesce option settings. These settings are applied to all the virtual machines in the protection group. When the protection group settings are changed, the changes are applied to all the virtual machines in the protection group.

Creating Protection Groups

Protection groups provide protection to the VMs where they are created. If protection groups have protected virtual machines that replicate to the remote cluster, these protection groups are listed in HX Connect. Before staring the configuration, ensure that replication network and replication pair are configured. Then follow these steps:

  • Step 1. Log in to HX Connect as an administrator.

  • Step 2. On the Replication page, click Create Group (see Figure 6-15.

    FIGURE 6-15

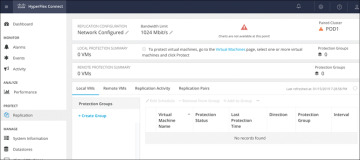
    Figure 6-15 Creating a Protection Group

  • Step 3. Enter the following information in the Create Protection Group dialog (see Figure 6-16):

    • Protection Group Name: The name for the new protection group for this local cluster

    • Protect virtual machines in this group every: The frequency at which virtual machines are to be replicated to the paired cluster

    • Start protecting the virtual machines immediately: Radio button to start replication immediately after adding the first virtual machine to the protection group

    • Start protecting the virtual machines at: Radio button to set a specific time for the first replication to start

    • Use VMware Tools to quiesce the virtual machine: Check box to have HX Data Platform quiesce the virtual machines before taking the replication snapshot

    FIGURE 6-16

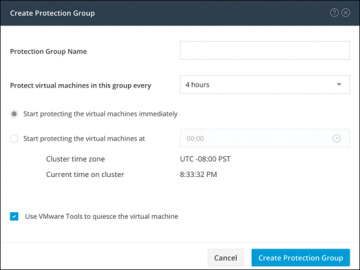
    Figure 6-16 Protection Group Settings

    Before starting replication, ensure that at least one virtual machine is added to the protection group and the scheduled start time is reached. To specify the protection start time, click in the time field and select an hour and minute.

  • Step 4. Click Create Protection Group to add the new group to the Protection Groups tab.

When the protection group is created, the next step is to add virtual machines to the created group.

Protecting Virtual Machines

This section describes how to protect multiple virtual machines using an existing protection group. Before starting, make sure that the replication network and replication pair are configured and that a protection group is created prior to adding the virtual machines. Then follow these steps:

  • Step 1. Log in to HX Connect as an administrator.

  • Step 2. On the Virtual Machines page, select one or more unprotected virtual machines from the list (see Figure 6-17).

    FIGURE 6-17

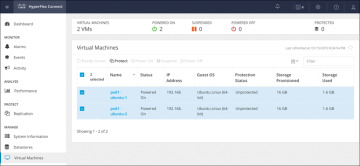
    Figure 6-17 Virtual Machine Display Window

  • Step 3. Click Protect.

  • Step 4. In the Protect Virtual Machines dialog (see Figure 6-18), verify the selected virtual machine name(s), storage provisioned, and storage used by the VMs

    • Add to an existing protection group: Click this radio button to select an existing protection group from the pull-down list.

    • Create a new protection group: Select this radio button to create a new protection group for the local cluster.

    FIGURE 6-18

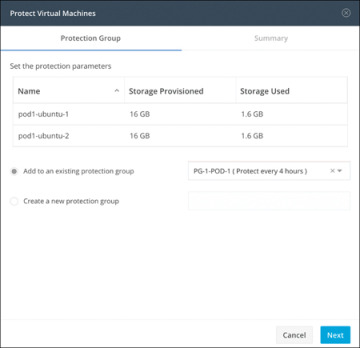
    Figure 6-18 Protect Virtual Machines Window: Protection Group Tab

  • Step 5. Click Next.

  • Step 6. Confirm the information shown on the Summary tab (see Figure 6-19) and click Add to Protection Group.

    FIGURE 6-19

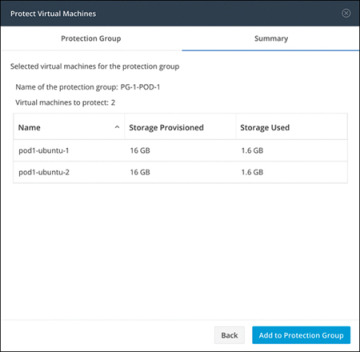
    Figure 6-19 Protect Virtual Machines Window: Summary Tab

5. Disaster Recovery Overview | Next Section Previous Section

Cisco Press Promotional Mailings & Special Offers

I would like to receive exclusive offers and hear about products from Cisco Press and its family of brands. I can unsubscribe at any time.

Overview

Pearson Education, Inc., 221 River Street, Hoboken, New Jersey 07030, (Pearson) presents this site to provide information about Cisco Press products and services that can be purchased through this site.

This privacy notice provides an overview of our commitment to privacy and describes how we collect, protect, use and share personal information collected through this site. Please note that other Pearson websites and online products and services have their own separate privacy policies.

Collection and Use of Information

To conduct business and deliver products and services, Pearson collects and uses personal information in several ways in connection with this site, including:

Questions and Inquiries

For inquiries and questions, we collect the inquiry or question, together with name, contact details (email address, phone number and mailing address) and any other additional information voluntarily submitted to us through a Contact Us form or an email. We use this information to address the inquiry and respond to the question.

Online Store

For orders and purchases placed through our online store on this site, we collect order details, name, institution name and address (if applicable), email address, phone number, shipping and billing addresses, credit/debit card information, shipping options and any instructions. We use this information to complete transactions, fulfill orders, communicate with individuals placing orders or visiting the online store, and for related purposes.

Surveys

Pearson may offer opportunities to provide feedback or participate in surveys, including surveys evaluating Pearson products, services or sites. Participation is voluntary. Pearson collects information requested in the survey questions and uses the information to evaluate, support, maintain and improve products, services or sites; develop new products and services; conduct educational research; and for other purposes specified in the survey.

Contests and Drawings

Occasionally, we may sponsor a contest or drawing. Participation is optional. Pearson collects name, contact information and other information specified on the entry form for the contest or drawing to conduct the contest or drawing. Pearson may collect additional personal information from the winners of a contest or drawing in order to award the prize and for tax reporting purposes, as required by law.

Newsletters

If you have elected to receive email newsletters or promotional mailings and special offers but want to unsubscribe, simply email information@ciscopress.com.

Service Announcements

On rare occasions it is necessary to send out a strictly service related announcement. For instance, if our service is temporarily suspended for maintenance we might send users an email. Generally, users may not opt-out of these communications, though they can deactivate their account information. However, these communications are not promotional in nature.

Customer Service

We communicate with users on a regular basis to provide requested services and in regard to issues relating to their account we reply via email or phone in accordance with the users' wishes when a user submits their information through our Contact Us form.

Other Collection and Use of Information

Application and System Logs

Pearson automatically collects log data to help ensure the delivery, availability and security of this site. Log data may include technical information about how a user or visitor connected to this site, such as browser type, type of computer/device, operating system, internet service provider and IP address. We use this information for support purposes and to monitor the health of the site, identify problems, improve service, detect unauthorized access and fraudulent activity, prevent and respond to security incidents and appropriately scale computing resources.

Web Analytics

Pearson may use third party web trend analytical services, including Google Analytics, to collect visitor information, such as IP addresses, browser types, referring pages, pages visited and time spent on a particular site. While these analytical services collect and report information on an anonymous basis, they may use cookies to gather web trend information. The information gathered may enable Pearson (but not the third party web trend services) to link information with application and system log data. Pearson uses this information for system administration and to identify problems, improve service, detect unauthorized access and fraudulent activity, prevent and respond to security incidents, appropriately scale computing resources and otherwise support and deliver this site and its services.

Cookies and Related Technologies

This site uses cookies and similar technologies to personalize content, measure traffic patterns, control security, track use and access of information on this site, and provide interest-based messages and advertising. Users can manage and block the use of cookies through their browser. Disabling or blocking certain cookies may limit the functionality of this site.

Do Not Track

This site currently does not respond to Do Not Track signals.

Security

Pearson uses appropriate physical, administrative and technical security measures to protect personal information from unauthorized access, use and disclosure.

Children

This site is not directed to children under the age of 13.

Marketing

Pearson may send or direct marketing communications to users, provided that

  • Pearson will not use personal information collected or processed as a K-12 school service provider for the purpose of directed or targeted advertising.
  • Such marketing is consistent with applicable law and Pearson's legal obligations.
  • Pearson will not knowingly direct or send marketing communications to an individual who has expressed a preference not to receive marketing.
  • Where required by applicable law, express or implied consent to marketing exists and has not been withdrawn.

Pearson may provide personal information to a third party service provider on a restricted basis to provide marketing solely on behalf of Pearson or an affiliate or customer for whom Pearson is a service provider. Marketing preferences may be changed at any time.

Correcting/Updating Personal Information

If a user's personally identifiable information changes (such as your postal address or email address), we provide a way to correct or update that user's personal data provided to us. This can be done on the Account page. If a user no longer desires our service and desires to delete his or her account, please contact us at customer-service@informit.com and we will process the deletion of a user's account.

Choice/Opt-out

Users can always make an informed choice as to whether they should proceed with certain services offered by Cisco Press. If you choose to remove yourself from our mailing list(s) simply visit the following page and uncheck any communication you no longer want to receive: www.ciscopress.com/u.aspx.

Sale of Personal Information

Pearson does not rent or sell personal information in exchange for any payment of money.

While Pearson does not sell personal information, as defined in Nevada law, Nevada residents may email a request for no sale of their personal information to NevadaDesignatedRequest@pearson.com.

Supplemental Privacy Statement for California Residents

California residents should read our Supplemental privacy statement for California residents in conjunction with this Privacy Notice. The Supplemental privacy statement for California residents explains Pearson's commitment to comply with California law and applies to personal information of California residents collected in connection with this site and the Services.

Sharing and Disclosure

Pearson may disclose personal information, as follows:

  • As required by law.
  • With the consent of the individual (or their parent, if the individual is a minor)
  • In response to a subpoena, court order or legal process, to the extent permitted or required by law
  • To protect the security and safety of individuals, data, assets and systems, consistent with applicable law
  • In connection the sale, joint venture or other transfer of some or all of its company or assets, subject to the provisions of this Privacy Notice
  • To investigate or address actual or suspected fraud or other illegal activities
  • To exercise its legal rights, including enforcement of the Terms of Use for this site or another contract
  • To affiliated Pearson companies and other companies and organizations who perform work for Pearson and are obligated to protect the privacy of personal information consistent with this Privacy Notice
  • To a school, organization, company or government agency, where Pearson collects or processes the personal information in a school setting or on behalf of such organization, company or government agency.

Links

This web site contains links to other sites. Please be aware that we are not responsible for the privacy practices of such other sites. We encourage our users to be aware when they leave our site and to read the privacy statements of each and every web site that collects Personal Information. This privacy statement applies solely to information collected by this web site.

Requests and Contact

Please contact us about this Privacy Notice or if you have any requests or questions relating to the privacy of your personal information.

Changes to this Privacy Notice

We may revise this Privacy Notice through an updated posting. We will identify the effective date of the revision in the posting. Often, updates are made to provide greater clarity or to comply with changes in regulatory requirements. If the updates involve material changes to the collection, protection, use or disclosure of Personal Information, Pearson will provide notice of the change through a conspicuous notice on this site or other appropriate way. Continued use of the site after the effective date of a posted revision evidences acceptance. Please contact us if you have questions or concerns about the Privacy Notice or any objection to any revisions.

Last Update: November 17, 2020